Set map type of GoogleMap

To set the type of map tiles, call setMapType(int type) method of the GoogleMap acquired in last exercise "Get GoogleMap from MapFragment/SupportMapFragment".

Where type can be:
  • MAP_TYPE_NONE
    No base map tiles.
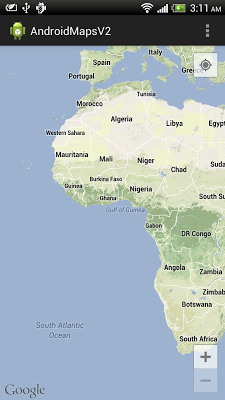
  • MAP_TYPE_NORMAL
    Basic maps.
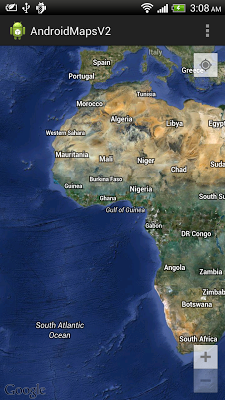
  • MAP_TYPE_SATELLITE
    Satellite maps with no labels.
  • MAP_TYPE_HYBRID
    Satellite maps with a transparent layer of major streets.
  • MAP_TYPE_TERRAIN
    Terrain maps.

Example:
   FragmentManager myFragmentManager = getSupportFragmentManager();
SupportMapFragment mySupportMapFragment
= (SupportMapFragment)myFragmentManager.findFragmentById(R.id.map);
myMap = mySupportMapFragment.getMap();

myMap.setMyLocationEnabled(true);

//myMap.setMapType(GoogleMap.MAP_TYPE_HYBRID);
//myMap.setMapType(GoogleMap.MAP_TYPE_NORMAL);
//myMap.setMapType(GoogleMap.MAP_TYPE_SATELLITE);
myMap.setMapType(GoogleMap.MAP_TYPE_TERRAIN);

MAP_TYPE_NORMAL
MAP_TYPE_NORMAL
MAP_TYPE_SATELLITE
MAP_TYPE_SATELLITE
MAP_TYPE_HYBRID
MAP_TYPE_HYBRID
MAP_TYPE_TERRAIN
MAP_TYPE_TERRAIN


The series:
A simple example using Google Maps Android API v2, step by step.


Display my location on Google Maps Android API v2

To display my location on Google Maps Android API v2, call setMyLocationEnabled(true) method of the GoogleMap acquired in last exercise "Get GoogleMap from MapFragment/SupportMapFragment".

While enabled, the my-location layer continuously draws an indication of a user's current location and bearing, and displays UI controls that allow a user to interact with their location (for example, to enable or disable camera tracking of their location and bearing).


myMap.setMyLocationEnabled(true);


Display my location on Google Maps Android API v2


The series:
A simple example using Google Maps Android API v2, step by step.

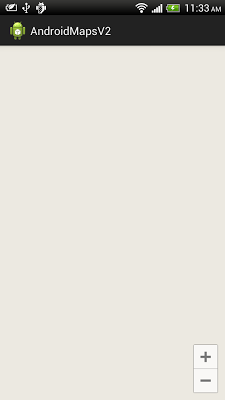
Google Maps Android API v2 with blank map displayed, wrong API Key assigned.

If you use Google Maps Android API v2, but with a blank (gray) map displayed (like the screen shown below), and "E/Google Maps Android API(12676): Authorization failure" reported in LogCat; may be caused by a wrong API Key assigned.

Google Maps Android API v2 with blank map displayed, wrong API Key assigned.


In order to use Maps Android API, you have to assign a API Key in AndroidManifest.xml.
        <meta-data
android:name="com.google.android.maps.v2.API_KEY"
android:value="your API Key here"/>


You have to assign Debug API Key in testing, and Release API Key when release APK. Just insert the correct API Key, clean and rebuild your project should be OK. It's suggested to un-install your old app in device before re-load.


The series:
A simple example using Google Maps Android API v2, step by step.
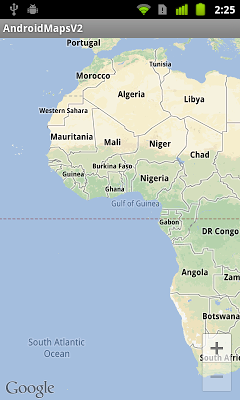
Using SupportMapFragment

The post "A simple example using Google Maps Android API v2" using com.google.android.gms.maps.MapFragment. It work on device run API 12 and above. For older API level, using com.google.android.gms.maps.SupportMapFragment.

SupportMapFragment on Nexus One running Android 2.3.6


Modify layout to replace com.google.android.gms.maps.MapFragment with com.google.android.gms.maps.SupportMapFragment.
<RelativeLayout xmlns:android="http://schemas.android.com/apk/res/android"
xmlns:tools="http://schemas.android.com/tools"
android:layout_width="match_parent"
android:layout_height="match_parent"
tools:context=".MainActivity" >

<TextView
android:layout_width="wrap_content"
android:layout_height="wrap_content"
android:layout_centerHorizontal="true"
android:layout_centerVertical="true"
android:text="@string/hello_world" />
<fragment
android:id="@+id/map"
android:layout_width="match_parent"
android:layout_height="match_parent"
class="com.google.android.gms.maps.SupportMapFragment"/>

</RelativeLayout>


Modify main code to extend android.support.v4.app.FragmentActivity, rather than Activity. Otherwise, AndroidRuntime will be Caused by: java.lang.ClassNotFoundException: android.view.fragment in loader dalvik.system.PathClassLoader.
package com.example.androidmapsv2;

import android.os.Bundle;
import android.support.v4.app.FragmentActivity;

public class MainActivity extends FragmentActivity {

@Override
protected void onCreate(Bundle savedInstanceState) {
super.onCreate(savedInstanceState);
setContentView(R.layout.activity_main);
}

}


The series:
A simple example using Google Maps Android API v2, step by step.
+1000

Finally get +1000 at the day of End of the World:)


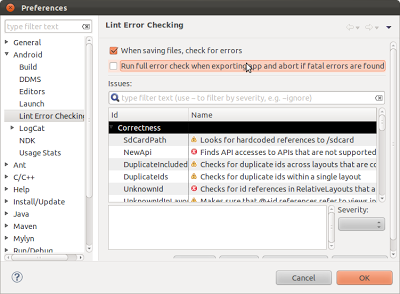
Turn off Lint Error Checking

After you finished coding with Google Maps Android API v2, and going to Export Signed Application Package (Right click your project -> Android Tools -> Export Signed Application Package...), MAY BE Export will be aborted because fetal lint errors were found, caused by something like:

"common_google_play_services_unknown_issue" is not translated...

lint error

It can be solved by turn off Run full error check.

Click Window in Eclipse, select Preferences.

Select Android -> Lint Error Checking on the left, and turn off "Run full error check when exporting app and abort if errors are found"


Then, you can clean and re-build your project.


Updated@2013-03-13: Updated steps with video.


The series:
A simple example using Google Maps Android API v2, step by step.

Modify AndroidManifest.xml for Google Maps Android API v2

To use Google Maps Android API v2 on your app, you have to modify your AndroidManifest.xml as listed below:
  • Insert <meta-data> element to include API key as a child of the <application>

    <meta-data
    android:name="com.google.android.maps.v2.API_KEY"
    android:value="--- your API Key here ---"/>


    Remember to replace value with your own API Key.

    Please notice that you have to use debug API Key (refer to "Generate Debug API Key for Google Maps Android API v2 service") in your testing. And then replace with release API key (refer to "Create and Obtain API Key for Google Maps Android API v2 service") in your release APK.
  • Add <permission> and <uses-permission> of MAPS_RECEIVE.

    <permission
    android:name="com.example.androidmapsv2.permission.MAPS_RECEIVE"
    android:protectionLevel="signature"></permission>
    <uses-permission
    android:name="com.example.androidmapsv2.permission.MAPS_RECEIVE"/>


    where com.example.androidmapsv2 is my package, replace with your own package name.

  • Add uses-permission:

    <uses-permission
    android:name="com.google.android.providers.gsf.permission.READ_GSERVICES"/>
    <uses-permission
    android:name="android.permission.INTERNET"/>
    <uses-permission
    android:name="android.permission.WRITE_EXTERNAL_STORAGE"/>


    and optional:

    <uses-permission
    android:name="android.permission.ACCESS_COARSE_LOCATION"/>
    <uses-permission
    android:name="android.permission.ACCESS_FINE_LOCATION"/>


  • Specify uses-feature of OpenGL ES 2:

    <uses-feature
    android:glEsVersion="0x00020000"
    android:required="true"/>


Finally, the AndroidManifest.xml will like it:

<?xml version="1.0" encoding="utf-8"?>
<manifest xmlns:android="http://schemas.android.com/apk/res/android"
package="com.example.androidmapsv2"
android:versionCode="1"
android:versionName="1.0" >

<uses-sdk
android:minSdkVersion="8"
android:targetSdkVersion="16" />

<permission
android:name="com.example.androidmapsv2.permission.MAPS_RECEIVE"
android:protectionLevel="signature"></permission>
<uses-permission
android:name="com.example.androidmapsv2.permission.MAPS_RECEIVE"/>
<uses-permission
android:name="com.google.android.providers.gsf.permission.READ_GSERVICES"/>
<uses-permission
android:name="android.permission.INTERNET"/>
<uses-permission
android:name="android.permission.WRITE_EXTERNAL_STORAGE"/>
<uses-permission
android:name="android.permission.ACCESS_COARSE_LOCATION"/>
<uses-permission
android:name="android.permission.ACCESS_FINE_LOCATION"/>

<uses-feature
android:glEsVersion="0x00020000"
android:required="true"/>

<application
android:allowBackup="true"
android:icon="@drawable/ic_launcher"
android:label="@string/app_name"
android:theme="@style/AppTheme" >
<meta-data
android:name="com.google.android.maps.v2.API_KEY"
android:value="--- your API Key here ---"/>
<activity
android:name="com.example.androidmapsv2.MainActivity"
android:label="@string/app_name" >
<intent-filter>
<action android:name="android.intent.action.MAIN" />

<category android:name="android.intent.category.LAUNCHER" />
</intent-filter>
</activity>
</application>

</manifest>


The series:
A simple example using Google Maps Android API v2, step by step.

Add reference library google-play-services.jar to project using MapFragment and SupportMapFragment

To use MapFragment or SupportMapFragment on your Android App, you have to add reference library google-play-services.jar to your project. Otherwise, ClassNotFoundException will be thrown caused by com.google.android.gms.maps.MapFragment or com.google.android.gms.maps.SupportMapFragment.

To add reference library google-play-services.jar:

- Right click on your project, select Properties.


- Select Android on the left selection, scroll down to the Library at right, and click Add.

- Select google-play-services_lib and click OK.

- Apply and click OK.


The series:
A simple example using Google Maps Android API v2, step by step.


Remark: Somebody report that ClassNotFOundException still happen even added reference library google-play-services.jar! Refer to comments in the post Using SupportMapFragment. So anybody have any other suggestion, please share in comments. Thanks.

Related:
- Tips to add Support Library


Generate Debug API Key for Google Maps Android API v2 service

The previous post explain how to "Create and Obtain API Key for Google Maps Android API v2 service". In my trial experience, you need a debug API Key, for your testing. Means you test on your device connected with PC and download from Eclipse.

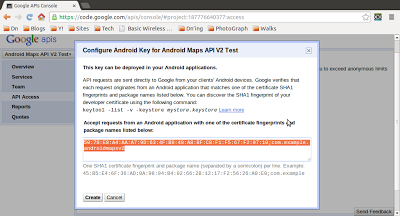
To generate debug API key, repeat the steps in the post  "Create and Obtain API Key for Google Maps Android API v2 service", with debug certificate fingerprint (described in the post "Displaying the SHA1 certificate fingerprint") instead of release certificate fingerprint. The output should be like this:

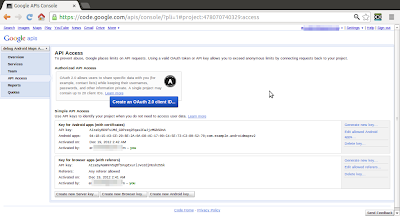
Debug API Key for Google Maps Android API v2 service

In my test, both API Key (Key for Android apps (with certificates) and Key for browser apps (with referers)) can display map.


The series:
A simple example using Google Maps Android API v2, step by step.
Create and Obtain API Key for Google Maps Android API v2 service

To obtain API Key for Google Maps Android API v2 service, you have to create API Project and obtaining your API Key in Google APIs Console.

Create API Project:

- Visit Google APIs Console, you have to login using your Google account.

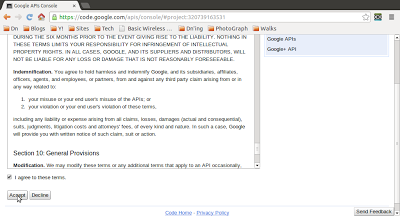
- Scroll down to check agree and accept to these terms.


- Expend the select on left and select Other projects -> Create...


- Enter the name of your project and click Create project.


- Make sure Service is selected on the left.


- Click to enable Google Maps Android API v2.


- You will be asked to agree and accept the terms of Google Maps/Earth APIs service.


- Your Google Maps Android API v2 services for the project will become ON now.


Obtain an API Key:

- Click API Access and Create New Android Key...


- Enter your SHA1 Certificate fingerprint (refer to the post "Displaying the SHA1 certificate fingerprint") and package name in the box, and click Create.


- Finally, your API Key generated.


The series:
A simple example using Google Maps Android API v2, step by step.

Displaying the SHA1 certificate fingerprint

There are two type of certificate fingerprint, debug and release.

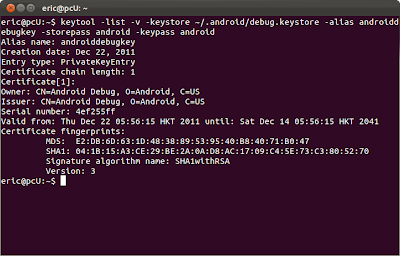
To display debug certificate fingerprint in Linus, simple open Terminal and type the command:
keytool -list -v -keystore ~/.android/debug.keystore -alias androiddebugkey -storepass android -keypass android


display debug certificate fingerprint


To display release certificate fingerprint, you need to create the release keystore and and sign the .APK once.

- Right click your project and select Android Tools -> Export Signed Application Package...


- Accept the selected project and click Next.


- Select Create new keystore, browse to select Location and enter Password, and click Next.


- Enter Alias, Password, Validity and at least one Certificate issue field, and click Next.


- Select destination APK, and click Finish.


After created the release keystore and and signed the .APK. you can display the release certificate fingerprint.

- open Terminal and type the command:
keytool -list -v -keystore <your_keystore_name> -alias <your_alias_name>

where:
<your_keystore_name> is the path and name of the keystore, including the .keystore extension.
<your_alias_name> is alias that you assigned to the certificate when you created it.


If you get error of "keytool error: java.lang.Exception: Keystore file does not exist", read HERE.

The series:
A simple example using Google Maps Android API v2, step by step.

Setup Google Play services SDK in Eclipse

The Google Play services SDK is an extension to the Android SDK and is available as a downloadable package from the SDK Manager. The download includes the client library and code samples.

To develop using the Google Play services APIs, you must download the Google Play services SDK. Google Play services is not supported on the Android emulator, a physical device runs Android 2.2 or higher must be used to run and debug apps using Google Play services SDK.

To install Google Play services SDK from Eclipse:

- Window > Android SDK Manager.

- Scroll to the bottom of the package list, select and install Extras > Google Play services.

- Accept and install.

- After installed, import the library project into your workspace. Click File > Import

- Select Android > Existing Android Code into Workspace, and browse to the copy of the library project to import it.

- click Browse to select <android-sdk-folder>/extras/google/google_play_services/libproject/google-play-services_lib, and click Finish.


The series:
A simple example using Google Maps Android API v2, step by step.