Processing + Android

Processing is an open source programming language and environment for people who want to create images, animations, and interactions. Initially developed to serve as a software sketchbook and to teach fundamentals of computer programming within a visual context, Processing also has evolved into a tool for generating finished professional work. Today, there are tens of thousands of students, artists, designers, researchers, and hobbyists who use Processing for learning, prototyping, and production.
  • Free to download and open source
  • Interactive programs using 2D, 3D or PDF output
  • OpenGL integration for accelerated 3D
  • For GNU/Linux, Mac OS X, and Windows
  • Projects run online or as double-clickable applications
  • Over 100 libraries extend the software into sound, video, computer vision, and more...
  • Well documented, with many books available

Processing for Android project is aim to make it foolishly easy to create Android apps using the Processing API. Once you have Processing on your machine (and the Android developer tools), you can simply write a line of code, hit Run (Ctrl-R or Cmd-R), and have your sketch show up in the emulator as a working Android app. Select Run on Device (Ctrl-Shift-R or Cmd-Shift-R) to have it run on an Android device that you have plugged into your machine. That's good stuff!

Read Tutorial to develop Android App with Processing version 2.0+.


Next:
- Download and install Processing software
- Setup Processing for Android development
- Hello World of Processing for Android


Release MediaPlayer in onDestroy() and onPause()

If you try run the last exercise of "Simple example of using MediaPlayer", you can notice that if you exit the app, the sound will still playing, and then switch back to the app, both old sound and new sound will overlap.

Actually, you have to release the MediaPlayer in onDestroy() and onPause(), when the app exit. Or any other handling method, depends on your own case.

 @Override
protected void onDestroy() {
// TODO Auto-generated method stub
super.onDestroy();
if (mediaPlayer != null) {
mediaPlayer.release();
mediaPlayer = null;
}
}

@Override
protected void onPause() {
// TODO Auto-generated method stub
super.onPause();
if (mediaPlayer != null) {
mediaPlayer.release();
mediaPlayer = null;
}
}

Simple example of using MediaPlayer


Next:
- Get video size for MediaPlayer by implementing onVideoSizeChanged()


Get the current frame in VideoView using MediaMetadataRetriever

Last exercise show a simple example to "Get image frame in video using MediaMetadataRetriever". In this exercise, we will play the video in a VideoView. Then capture the frame at the position when user click on the button.

Get the current frame in VideoView using MediaMetadataRetriever


layout file.
<LinearLayout xmlns:android="http://schemas.android.com/apk/res/android"
xmlns:tools="http://schemas.android.com/tools"
android:layout_width="match_parent"
android:layout_height="match_parent"
android:paddingBottom="@dimen/activity_vertical_margin"
android:paddingLeft="@dimen/activity_horizontal_margin"
android:paddingRight="@dimen/activity_horizontal_margin"
android:paddingTop="@dimen/activity_vertical_margin"
android:orientation="vertical"
tools:context=".MainActivity" >

<TextView
android:layout_width="wrap_content"
android:layout_height="wrap_content"
android:text="@string/hello_world" />
<Button
android:id="@+id/capture"
android:layout_width="wrap_content"
android:layout_height="wrap_content"
android:text="capture video image" />
<VideoView
android:id="@+id/videoview"
android:layout_width="match_parent"
android:layout_height="match_parent" />

</LinearLayout>


MainActivity.java
package com.example.androidvideoview;

import android.graphics.Bitmap;
import android.media.MediaMetadataRetriever;
import android.media.MediaPlayer;
import android.net.Uri;
import android.os.Bundle;
import android.app.Activity;
import android.app.AlertDialog;
import android.view.View;
import android.view.View.OnClickListener;
import android.view.ViewGroup.LayoutParams;
import android.widget.Button;
import android.widget.ImageView;
import android.widget.MediaController;
import android.widget.Toast;
import android.widget.VideoView;

public class MainActivity extends Activity {

MediaMetadataRetriever mediaMetadataRetriever;
MediaController myMediaController;
VideoView myVideoView;
String viewSource = "/storage/sdcard0/DCIM/100MEDIA/VIDEO0009.mp4";

@Override
protected void onCreate(Bundle savedInstanceState) {
super.onCreate(savedInstanceState);
setContentView(R.layout.activity_main);

mediaMetadataRetriever = new MediaMetadataRetriever();
mediaMetadataRetriever.setDataSource(viewSource);

myVideoView = (VideoView) findViewById(R.id.videoview);
myVideoView.setVideoURI(Uri.parse(viewSource));
myMediaController = new MediaController(this);
myVideoView.setMediaController(myMediaController);

myVideoView.setOnCompletionListener(myVideoViewCompletionListener);
myVideoView.setOnPreparedListener(MyVideoViewPreparedListener);
myVideoView.setOnErrorListener(myVideoViewErrorListener);

myVideoView.requestFocus();
myVideoView.start();

Button buttonCapture = (Button)findViewById(R.id.capture);
buttonCapture.setOnClickListener(new OnClickListener(){

@Override
public void onClick(View arg0) {

int currentPosition = myVideoView.getCurrentPosition(); //in millisecond
Toast.makeText(MainActivity.this,
"Current Position: " + currentPosition + " (ms)",
Toast.LENGTH_LONG).show();

Bitmap bmFrame = mediaMetadataRetriever
.getFrameAtTime(currentPosition * 1000); //unit in microsecond

if(bmFrame == null){
Toast.makeText(MainActivity.this,
"bmFrame == null!",
Toast.LENGTH_LONG).show();
}else{
AlertDialog.Builder myCaptureDialog =
new AlertDialog.Builder(MainActivity.this);
ImageView capturedImageView = new ImageView(MainActivity.this);
capturedImageView.setImageBitmap(bmFrame);
LayoutParams capturedImageViewLayoutParams =
new LayoutParams(LayoutParams.WRAP_CONTENT,
LayoutParams.WRAP_CONTENT);
capturedImageView.setLayoutParams(capturedImageViewLayoutParams);

myCaptureDialog.setView(capturedImageView);
myCaptureDialog.show();
}

}});
}

MediaPlayer.OnCompletionListener myVideoViewCompletionListener =
new MediaPlayer.OnCompletionListener() {

@Override
public void onCompletion(MediaPlayer arg0) {
Toast.makeText(MainActivity.this, "End of Video",
Toast.LENGTH_LONG).show();
}
};

MediaPlayer.OnPreparedListener MyVideoViewPreparedListener =
new MediaPlayer.OnPreparedListener() {

@Override
public void onPrepared(MediaPlayer mp) {

long duration = myVideoView.getDuration(); //in millisecond
Toast.makeText(MainActivity.this,
"Duration: " + duration + " (ms)",
Toast.LENGTH_LONG).show();

}
};

MediaPlayer.OnErrorListener myVideoViewErrorListener =
new MediaPlayer.OnErrorListener() {

@Override
public boolean onError(MediaPlayer mp, int what, int extra) {

Toast.makeText(MainActivity.this,
"Error!!!",
Toast.LENGTH_LONG).show();
return true;
}
};

}


Note: To use MediaMetadataRetriever, minSdkVersion="10" have to be defined in AndroidManifest.xml.

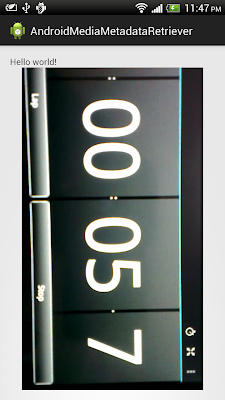
Get image frame in video using MediaMetadataRetriever

MediaMetadataRetriever, for API level 10 or higher, provides a unified interface for retrieving frame and meta data from an input media file.

Example to retrieve frame in video:

retrieve frame in video


package com.example.androidmediametadataretriever;

import android.graphics.Bitmap;
import android.media.MediaMetadataRetriever;
import android.os.Bundle;
import android.widget.ImageView;
import android.app.Activity;

public class MainActivity extends Activity {

String uri = "/storage/sdcard0/DCIM/100MEDIA/VIDEO0007.mp4";

@Override
protected void onCreate(Bundle savedInstanceState) {
super.onCreate(savedInstanceState);
setContentView(R.layout.activity_main);
ImageView capturedImageView = (ImageView)findViewById(R.id.capturedimage);

MediaMetadataRetriever mediaMetadataRetriever = new MediaMetadataRetriever();

mediaMetadataRetriever.setDataSource(uri);
Bitmap bmFrame = mediaMetadataRetriever.getFrameAtTime(5000000); //unit in microsecond
capturedImageView.setImageBitmap(bmFrame);
}

}


Next:
- Get the current frame in VideoView using MediaMetadataRetriever


Updated@2014-12-29:
Permission of "android.permission.READ_EXTERNAL_STORAGE" is needed, otherwise MediaMetadataRetriever.setDataSource() will throw IllegalArgumentException.

Read: MediaMetadataRetriever: IllegalArgumentException thrown from setDataSource()


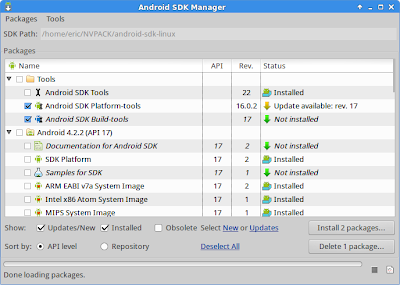
"Type R cannot be resolved to a variable" after Android SDK updated

If you get the error of "Type R cannot be resolved to a variable" after Android SDK and ADT updated. Try to find and install any available update in Android SDK.

In my case, after update Android SDK Tools rev 22, and also ADT. I get error of "Type R cannot be resolved to a variable" in my projects, and any new project!

- Start Android SDK Manager again. Two more update available, Android SDK Platform-tools and Android SDK Build-tools. It was not available in the previous update.


- Install the update packages.

- Close and restart Eclipse.

- Problem solved.


Tegra Android Development Pack

The Tegra Android Development Pack 2.0 installs all software tools required to develop for Android on NVIDIA’s Tegra platform. This suite of developer tools is targeted at Tegra devices, but will configure a development environment that will work with almost any Android device. This cure for the common cold is available on Windows, OSX, Ubuntu Linux 32-bit and Ubuntu Linux 64-bit.


To Download The Files Below, you must be a member of the Tegra Registered Developer Program. To join simply create a new account (it's free and easy).

Intel introduce Beacon Mountain, a Development Environment for Android Apps


Learn about Beacon Mountain - Intel's development environment for creating applications for Intel Atom and ARM*-based devices running Android* operating systems.

Install Android Studio on Ubuntu with error of "Plugin com.intellij failed to initialize and will be disabled"

Just try to install the Early Access Preview of Android Studio on Ubuntu 13.04. But error of "Plugin com.intellij failed to initialize and will be disabled:null" happen...!


It's due to IntelliJ IDEA need fixed installation of JDK, it have to be one of the following location:
  • /usr/java
  • /opt/java
  • /usr/lib/jvm
Android Studio installed successful


Remark: After you installed JDK in the location, you have to set environment parameter point to the installed location. In my practice, I use the following commands in Terminal to update alternatives:

$sudo update-alternatives --install /usr/bin/javac javac /opt/java/bin/javac 1
$sudo update-alternatives --install /usr/bin/java java /opt/java/bin/java 1

where /opt/java/ is the location of my installed JDK.

New Features in Android Location

Google I/O 2013 - Beyond the Blue Dot: New Features in Android Location


What's New in Android Developer Tools - Google I/O 2013


An in-depth tour of the Android development tools, with a closer look at everything new - along with tips and tricks for getting the most out of them.

Google I/O 2013 Video is now live

Google I/O 2013: Keynote


More is available and more is to come: http://www.youtube.com/googledevelopers

Android SDK Tools update rev.22

Android SDK Tools rev.22 is available. To update your tools in Eclipse, select Window -> Android SDK Manager.

Android SDK Tools update rev.22


This Android SDK requires Android Developer Toolkit version 22.0.0 or above.


(To manually update Android Developer Toolkit, select Help -> check for updates.)


Early Access Preview of Android Studio is available now

Android Studio is a new Android development environment based on IntelliJ IDEA. Similar to Eclipse with the ADT Plugin, Android Studio provides integrated Android developer tools for development and debugging. On top of the capabilities you expect from IntelliJ, Android Studio offers:
  • Gradle-based build support.
  • Android-specific refactoring and quick fixes.
  • Lint tools to catch performance, usability, version compatibility and other problems.
  • ProGuard and app-signing capabilities.
  • Template-based wizards to create common Android designs and components.
  • A rich layout editor that allows you to drag-and-drop UI components, preview layouts on multiple screen configurations, and much more.
visit: http://developer.android.com/sdk/installing/studio.html


Tor Norbye gives a quick a preview of Android Studio. It's a brand new fully featured IDE based on the community edition of IntelliJ.

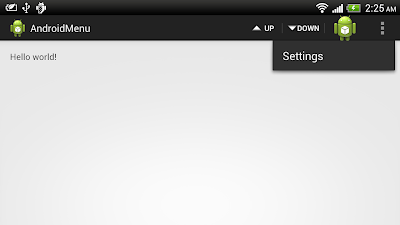
Show and hide menu item programatically

Last post show how to "create Menu". To show and hide individual menu item at run-time using Java code, you can call:

MenuItem item = menu.findItem(<id>);
item.setVisible(<true/false>);

where menu is the Menu parameter passed to onCreateOptionsMenu(Menu menu) callback method.

Show and hide menu item programatically


Modify from last post. Add two ToggleButtons in layout to toggle Menu Item Up and Down.
<LinearLayout xmlns:android="http://schemas.android.com/apk/res/android"
xmlns:tools="http://schemas.android.com/tools"
android:layout_width="match_parent"
android:layout_height="match_parent"
android:paddingBottom="@dimen/activity_vertical_margin"
android:paddingLeft="@dimen/activity_horizontal_margin"
android:paddingRight="@dimen/activity_horizontal_margin"
android:paddingTop="@dimen/activity_vertical_margin"
android:orientation="vertical"
tools:context=".MainActivity" >

<TextView
android:layout_width="wrap_content"
android:layout_height="wrap_content"
android:text="@string/hello_world" />
<ToggleButton
android:id="@+id/buttonup"
android:layout_width="match_parent"
android:layout_height="wrap_content"
android:checked="true"
android:textOn="Menu item Up - ON"
android:textOff="Menu item Up - OFF"/>
<ToggleButton
android:id="@+id/buttondown"
android:layout_width="match_parent"
android:layout_height="wrap_content"
android:checked="true"
android:textOn="Menu item Down - ON"
android:textOff="Menu item Down - OFF"/>

</LinearLayout>


MainActivity.java
package com.example.androidmenu;

import android.os.Bundle;
import android.app.Activity;
import android.view.Menu;
import android.view.MenuItem;
import android.widget.CompoundButton;
import android.widget.CompoundButton.OnCheckedChangeListener;
import android.widget.Toast;
import android.widget.ToggleButton;

public class MainActivity extends Activity {

Menu menu;
ToggleButton toggleButtonUp, toggleButtonDown;

@Override
protected void onCreate(Bundle savedInstanceState) {
super.onCreate(savedInstanceState);
setContentView(R.layout.activity_main);
toggleButtonUp = (ToggleButton)findViewById(R.id.buttonup);
toggleButtonDown = (ToggleButton)findViewById(R.id.buttondown);

toggleButtonUp.setOnCheckedChangeListener(new OnCheckedChangeListener(){

@Override
public void onCheckedChanged(CompoundButton buttonView, boolean isChecked) {

if(menu != null){
MenuItem item_up = menu.findItem(R.id.action_up);
item_up.setVisible(isChecked);
}

}});

toggleButtonDown.setOnCheckedChangeListener(new OnCheckedChangeListener(){

@Override
public void onCheckedChanged(CompoundButton buttonView, boolean isChecked) {

if (menu != null){
MenuItem item_down = menu.findItem(R.id.action_down);
item_down.setVisible(isChecked);
}

}});
}

@Override
public boolean onCreateOptionsMenu(Menu menu) {
// Inflate the menu; this adds items to the action bar if it is present.
this.menu = menu;
getMenuInflater().inflate(R.menu.main, menu);
return true;
}

@Override
public boolean onOptionsItemSelected(MenuItem item) {

switch(item.getItemId()){
case R.id.action_settings:
Toast.makeText(getApplicationContext(),
"Setting...",
Toast.LENGTH_SHORT).show();
break;
case R.id.action_up:
Toast.makeText(getApplicationContext(),
"Up...",
Toast.LENGTH_SHORT).show();
break;
case R.id.action_down:
Toast.makeText(getApplicationContext(),
"Down...",
Toast.LENGTH_SHORT).show();
break;
case R.id.action_other:
Toast.makeText(getApplicationContext(),
"Other...",
Toast.LENGTH_SHORT).show();
break;
default:
Toast.makeText(getApplicationContext(),
"Unknown...",
Toast.LENGTH_SHORT).show();
break;
}

//Return false to allow normal menu processing to proceed,
//true to consume it here.
return false;
}

}


Please notice that the null checking on menu in onCheckedChanged() is prevent the application from crash dur to menu become null after orientation changed. Actually, in this simple example, the system will keep status of the ToggleButtons after orientation changed, but not the visibility of Menu items. Such that both the Menu item will return to ON state, but the ToggleButton may be OFF.


The menu items return to ON after orientation changed!


To save instance state for Menu Items in orientation changed, read the next article.

Example to create Menu

Create Menu


Modify /res/menu/main.xml to define menu items.
<menu xmlns:android="http://schemas.android.com/apk/res/android" >

<item
android:id="@+id/action_settings"
android:orderInCategory="100"
android:showAsAction="never"
android:title="@string/action_settings"/>

<item
android:id="@+id/action_up"
android:orderInCategory="100"
android:showAsAction="ifRoom|withText"
android:icon="@android:drawable/arrow_up_float"
android:title="Up"/>
<item
android:id="@+id/action_down"
android:orderInCategory="100"
android:showAsAction="ifRoom|withText"
android:icon="@android:drawable/arrow_down_float"
android:title="Down"/>
<item
android:id="@+id/action_other"
android:orderInCategory="100"
android:showAsAction="ifRoom"
android:icon="@drawable/ic_launcher"
android:title="Other"/>

</menu>


To load menu, override onCreateOptionsMenu() method to inflate R.menu.main. It's loaded in default generated code.

To handle menu item selected, override onOptionsItemSelected() method.

MainActivity.java
package com.example.androidmenu;

import android.os.Bundle;
import android.app.Activity;
import android.view.Menu;
import android.view.MenuItem;
import android.widget.Toast;

public class MainActivity extends Activity {

@Override
protected void onCreate(Bundle savedInstanceState) {
super.onCreate(savedInstanceState);
setContentView(R.layout.activity_main);
}

@Override
public boolean onCreateOptionsMenu(Menu menu) {
// Inflate the menu; this adds items to the action bar if it is present.
getMenuInflater().inflate(R.menu.main, menu);
return true;
}

@Override
public boolean onOptionsItemSelected(MenuItem item) {

switch(item.getItemId()){
case R.id.action_settings:
Toast.makeText(getApplicationContext(),
"Setting...",
Toast.LENGTH_SHORT).show();
break;
case R.id.action_up:
Toast.makeText(getApplicationContext(),
"Up...",
Toast.LENGTH_SHORT).show();
break;
case R.id.action_down:
Toast.makeText(getApplicationContext(),
"Down...",
Toast.LENGTH_SHORT).show();
break;
case R.id.action_other:
Toast.makeText(getApplicationContext(),
"Other...",
Toast.LENGTH_SHORT).show();
break;
default:
Toast.makeText(getApplicationContext(),
"Unknown...",
Toast.LENGTH_SHORT).show();
break;
}

//Return false to allow normal menu processing to proceed,
//true to consume it here.
return false;
}

}


Next:
- Show and hide menu item programatically


Google Play Developers Can Now Reply to User Reviews

Google announced that all developers on Google Play can now reply to user reviews. You can reply to user reviews in the Google Play Developer Console, and your replies are shown publicly below the corresponding user review on Google Play. Users receive an email notification when you reply and can either reply to you directly by email, or update their review if they choose to do so.

source: Android Developers Blog

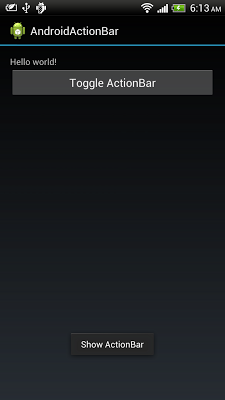
Save state of ActionBar visibility

Last exercise demonstrate how to "Show and hide ActionBar using Java code". But, once configuration changed (such as orientation change), ActionBar will return to setting in AndroidManifest.xml. To resume the user set visibility of ActionBar, we can save it in onSaveInstanceState() and restore it in onCreate().

Please notice that it can save state for configuration change only: if the app is killed or finished, then re-started, it will return to AndroidManifest.xml set visibility.

Save state of ActionBar visibility


package com.example.androidactionbar;

import android.os.Bundle;
import android.app.ActionBar;
import android.app.Activity;
import android.view.View;
import android.view.View.OnClickListener;
import android.widget.Button;
import android.widget.Toast;

public class MainActivity extends Activity {

@Override
protected void onCreate(Bundle savedInstanceState) {
super.onCreate(savedInstanceState);
setContentView(R.layout.activity_main);
Button buttonToggleActionBar = (Button)findViewById(R.id.toggleactionbar);
buttonToggleActionBar.setOnClickListener(new OnClickListener(){

@Override
public void onClick(View arg0) {
ActionBar myActionBar = getActionBar();
boolean myActionBarisShowing = myActionBar.isShowing();
if(myActionBarisShowing){
myActionBar.hide();
Toast.makeText(getApplicationContext(),
"Hide ActionBar",
Toast.LENGTH_LONG).show();
}else{
myActionBar.show();
Toast.makeText(getApplicationContext(),
"Show ActionBar",
Toast.LENGTH_LONG).show();
}
}});

Button buttonFinish = (Button)findViewById(R.id.finish);
buttonFinish.setOnClickListener(new OnClickListener(){

@Override
public void onClick(View v) {
finish();
}});

if (savedInstanceState != null) {
Boolean savedActionBarisShowing =
savedInstanceState.getBoolean("KEY_ACTIONBAR_ISSHOWING", true);
if(savedActionBarisShowing){
getActionBar().show();
}else{
getActionBar().hide();
}
}
}

@Override
protected void onSaveInstanceState(Bundle outState) {
super.onSaveInstanceState(outState);
outState.putBoolean("KEY_ACTIONBAR_ISSHOWING", getActionBar().isShowing());
}

}


<LinearLayout xmlns:android="http://schemas.android.com/apk/res/android"
xmlns:tools="http://schemas.android.com/tools"
android:layout_width="match_parent"
android:layout_height="match_parent"
android:paddingBottom="@dimen/activity_vertical_margin"
android:paddingLeft="@dimen/activity_horizontal_margin"
android:paddingRight="@dimen/activity_horizontal_margin"
android:paddingTop="@dimen/activity_vertical_margin"
android:orientation="vertical"
tools:context=".MainActivity" >

<TextView
android:layout_width="wrap_content"
android:layout_height="wrap_content"
android:text="@string/hello_world" />
<Button
android:id="@+id/toggleactionbar"
android:layout_width="match_parent"
android:layout_height="wrap_content"
android:text="Toggle ActionBar" />
<Button
android:id="@+id/finish"
android:layout_width="match_parent"
android:layout_height="wrap_content"
android:text="finish()" />

</LinearLayout>


Show and hide ActionBar using Java code

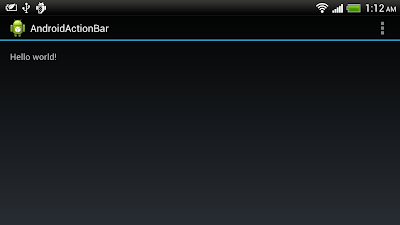
With android:theme="@android:style/Theme.Holo" is using, Java code can detect if ActionBar is showing currently by calling ActionBar.isShowing() method, and show/hide it by calling ActionBar.show()/ActionBar.hide().

Show and hide ActionBar using Java code


package com.example.androidactionbar;

import android.os.Bundle;
import android.app.ActionBar;
import android.app.Activity;
import android.view.View;
import android.view.View.OnClickListener;
import android.widget.Button;
import android.widget.Toast;

public class MainActivity extends Activity {

@Override
protected void onCreate(Bundle savedInstanceState) {
super.onCreate(savedInstanceState);
setContentView(R.layout.activity_main);
Button buttonToggleActionBar = (Button)findViewById(R.id.toggleactionbar);
buttonToggleActionBar.setOnClickListener(new OnClickListener(){

@Override
public void onClick(View arg0) {
ActionBar myActionBar = getActionBar();
boolean myActionBarisShowing = myActionBar.isShowing();
if(myActionBarisShowing){
myActionBar.hide();
Toast.makeText(getApplicationContext(),
"Hide ActionBar",
Toast.LENGTH_LONG).show();
}else{
myActionBar.show();
Toast.makeText(getApplicationContext(),
"Show ActionBar",
Toast.LENGTH_LONG).show();
}
}});
}

}


<LinearLayout xmlns:android="http://schemas.android.com/apk/res/android"
xmlns:tools="http://schemas.android.com/tools"
android:layout_width="match_parent"
android:layout_height="match_parent"
android:paddingBottom="@dimen/activity_vertical_margin"
android:paddingLeft="@dimen/activity_horizontal_margin"
android:paddingRight="@dimen/activity_horizontal_margin"
android:paddingTop="@dimen/activity_vertical_margin"
android:orientation="vertical"
tools:context=".MainActivity" >

<TextView
android:layout_width="wrap_content"
android:layout_height="wrap_content"
android:text="@string/hello_world" />
<Button
android:id="@+id/toggleactionbar"
android:layout_width="match_parent"
android:layout_height="wrap_content"
android:text="Toggle ActionBar" />

</LinearLayout>


AndroidManifest.xml
<?xml version="1.0" encoding="utf-8"?>
<manifest xmlns:android="http://schemas.android.com/apk/res/android"
package="com.example.androidactionbar"
android:versionCode="1"
android:versionName="1.0" >

<uses-sdk
android:minSdkVersion="11"
android:targetSdkVersion="17" />

<application
android:allowBackup="true"
android:icon="@drawable/ic_launcher"
android:label="@string/app_name"
android:theme="@android:style/Theme.Holo" >
<activity
android:name="com.example.androidactionbar.MainActivity"
android:label="@string/app_name" >
<intent-filter>
<action android:name="android.intent.action.MAIN" />

<category android:name="android.intent.category.LAUNCHER" />
</intent-filter>
</activity>
</application>

</manifest>


Related:
- Display and hide ActionBar in XML

Next:
- Save state of ActionBar visibility

Display and hide ActionBar in XML

To use Theme.Holo (or its descendants) for Android 3.0 or higher to show ActionBar.

android:theme="@android:style/Theme.Holo"

@android:style/Theme.Holo

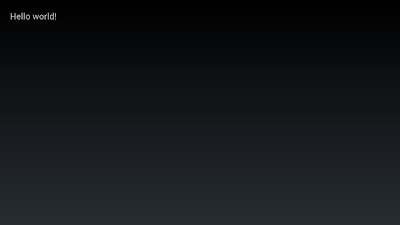
To hide Action Bar use Theme.Holo.NoActionBar or Theme.Holo.NoActionBar.Fullscreen.

android:theme="@android:style/Theme.Holo.NoActionBar"


@android:style/Theme.Holo.NoActionBar

android:theme="@android:style/Theme.Holo.NoActionBar.Fullscreen"

@android:style/Theme.Holo.NoActionBar.Fullscreen


Related:
- Show and hide ActionBar using Java code


The official Google I/O 2013 conference companion app


The official Google I/O 2013 conference companion app supports devices running Android 2.3+, and is optimized for phones and tablets of all shapes and sizes.
With the app you can:
- View the conference agenda and edit your personal schedule
- Sync your schedule between all of your devices and the I/O website
- View detailed session, code lab, officed hours, and speaker information, including speaker bios, photos, and Google+ profiles
- +1 sessions right from the app
- Participate in public #io13 conversations on Google+
- Guide yourself using the vector-based conference map
- Get a reminder a few minutes before sessions in your schedule are due to start
- View information about companies in the Developer Sandbox
- Keep up with announcements from the I/O team during the conference
- View your schedule on your Android 3.0+ device's home and lock screens using widget
- Play "I/O Live" session video streams on your Android 3.0+ devices
- Beam session details from your Android 4.0, NFC-enabled device to another using Android Beam
- Scan attendee badges on your NFC-enabled device
Source code for the app will be available soon at http://code.google.com/p/iosched


Watch Google I/O live

You can stream Google I/O May 15-16 live. Brought to you by Google Developers Live (GDL), the Google I/O homepage will become the GDL at I/O live streaming hub starting on May 15th at 9:00 AM PT (16:00 UTC). From this page, you can:
  • Stream 4 channels of technical content on your computer, tablet, or phone. You’ll feel like you’re right there in the keynote and session rooms, listening to product announcements straight from the source. Live streaming will run on developers.google.com/io from 9 AM PT (16:00 UTC) to 7 PM PT (2:00 UTC) on May 15 and 16.
  • Watch exclusive interviews with the Googlers behind the latest product announcements.This year, GDL will be on site, broadcasting one-on-one product deep dives, executive interviews, and Sandbox walkthroughs from the GDL stage.
  • Get the latest news in real-time. We’ll be posting official announcements during I/O. You’ll be able to see the feed on the Google I/O homepage, in the I/O mobile app (coming soon), and on +Google Developers.
  • Never miss a session. All Google I/O technical sessions will be recorded and posted toGDL and the Google Developers YouTube channel. Subscribe to our YouTube channel for archived session updates.


Source: Google Developers Blog - We’re going live from Google I/O