Google is standardizing on two primary tools for helping developers protect against unauthorized copying: app encryption in Jelly Bean and the Licensing Service for all platforms. The older Copy Protection feature, which announced have be deprecating back in 2010, is now going away in favor of these more advanced tools. The Copy Protection feature will no longer be available in the Developer Console starting February 27, 2013 and will no longer be applied on new downloads in Google Play very soon after that. If your app has been using this feature and you would like to continue to protect against unauthorized copying, please begin using the Licensing Service.
Learn more.

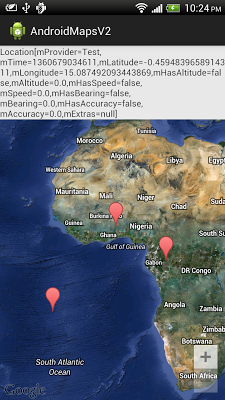
Convert between LatLng and Location
This example demonstrate how to convert between LatLng and Location. Refer onMapClick() in the code.
The series:
 A simple example using Google Maps Android API v2, step by step.

package com.example.androidmapsv2;

import java.util.Date;

import com.google.android.gms.maps.GoogleMap;
import com.google.android.gms.maps.GoogleMap.OnMapClickListener;
import com.google.android.gms.maps.MapFragment;
import com.google.android.gms.maps.model.LatLng;
import com.google.android.gms.maps.model.MarkerOptions;

import android.location.Location;
import android.os.Bundle;
import android.app.Activity;
import android.app.FragmentManager;
import android.widget.TextView;

public class MainActivity extends Activity
 implements OnMapClickListener{

 private GoogleMap myMap;

 TextView info;

    @Override
    protected void onCreate(Bundle savedInstanceState) {
        super.onCreate(savedInstanceState);
        setContentView(R.layout.activity_main);

        FragmentManager myFragmentManager = getFragmentManager();
        MapFragment myMapFragment =
          (MapFragment)myFragmentManager.findFragmentById(R.id.map);
        myMap = myMapFragment.getMap();

        myMap.setOnMapClickListener(this);

        info = (TextView)findViewById(R.id.info);

        myMap.setMapType(GoogleMap.MAP_TYPE_HYBRID);
        myMap.getUiSettings().setZoomControlsEnabled(true);
        myMap.getUiSettings().setCompassEnabled(true);
        myMap.getUiSettings().setAllGesturesEnabled(true);
    }


 @Override
 public void onMapClick(LatLng point) {
  //myMap.addMarker(new MarkerOptions().position(point).title(point.toString()));

  //The code below demonstrate how to convert between LatLng and Location

  //Convert LatLng to Location
  Location location = new Location("Test");
  location.setLatitude(point.latitude);
  location.setLongitude(point.longitude);
  location.setTime(new Date().getTime()); //Set time as current Date
  info.setText(location.toString());

  //Convert Location to LatLng
  LatLng newLatLng = new LatLng(location.getLatitude(), location.getLongitude());

  MarkerOptions markerOptions = new MarkerOptions()
           .position(newLatLng)
           .title(newLatLng.toString());

  myMap.addMarker(markerOptions);

 }

}
<LinearLayout xmlns:android="http://schemas.android.com/apk/res/android"
    xmlns:tools="http://schemas.android.com/tools"
    android:layout_width="match_parent"
    android:layout_height="match_parent"
    android:orientation="vertical"
    tools:context=".MainActivity" >

 <TextView
     android:id="@+id/info"
     android:layout_width="match_parent"
     android:layout_height="wrap_content" />

    <fragment
        android:id="@+id/map"
        android:layout_width="match_parent"
        android:layout_height="match_parent"
        class="com.google.android.gms.maps.MapFragment"/>

</LinearLayout>
The series:
Implement shape of oval using XML
Last exercise demonstrate how to "Implement shape of rounded-rect using XML", with little bit of modification, we can shape of oval. Like this:

/res/drawable/oval.xml
Layout with shape of oval.

/res/drawable/oval.xml
<?xml version="1.0" encoding="utf-8"?>
<shape
    xmlns:android="http://schemas.android.com/apk/res/android"
    android:shape="oval">

    <gradient
        android:angle="90"
        android:startColor="#FF000000"
        android:endColor="#FFFFFFFF"
        android:type= "linear" />
    <stroke
        android:width="1dp"
        android:color="#FF000000" />
    <padding
        android:left="15dp"
        android:top="15dp"
        android:right="15dp"
        android:bottom="15dp" />
</shape>
Layout with shape of oval.
<LinearLayout xmlns:android="http://schemas.android.com/apk/res/android"
    xmlns:tools="http://schemas.android.com/tools"
    android:layout_width="match_parent"
    android:layout_height="match_parent"
    android:orientation="vertical"
    android:padding="10dp"
    tools:context=".MainActivity" >

    <TextView
        android:layout_width="wrap_content"
        android:layout_height="wrap_content"
        android:text="@string/hello_world" />

    <LinearLayout
        android:layout_width="match_parent"
        android:layout_height="match_parent"
        android:orientation="vertical"
        android:background="@drawable/oval" >

        <ImageView
            android:layout_width="wrap_content"
            android:layout_height="wrap_content"
            android:src="@drawable/ic_launcher"
            android:background="@drawable/oval" />
        <TextView
            android:layout_width="match_parent"
            android:layout_height="wrap_content"
            android:text="normal TextView"
            android:layout_margin="5dp" />
        <TextView
            android:layout_width="match_parent"
            android:layout_height="wrap_content"
            android:text="TextView with roundrect"
            android:layout_margin="5dp"
            android:background="@drawable/oval" />
        <EditText
            android:layout_width="match_parent"
            android:layout_height="wrap_content"
            android:hint="normal EditText"
            android:layout_margin="5dp" />
        <EditText
            android:layout_width="match_parent"
            android:layout_height="wrap_content"
            android:hint="EditText with roundrect"
            android:text="Hello"
            android:layout_margin="5dp"
            android:background="@drawable/oval" />
    </LinearLayout>

</LinearLayout>
Define shape of rounded-rect for View using XML
This example demonstrate how to define rounded-rect shape for View, in XML; to implement layout as shown here:
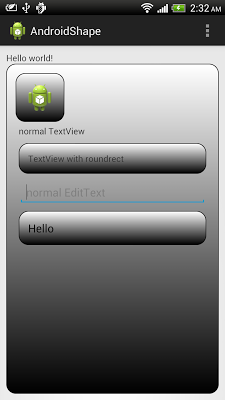
Create /res/drawable/roundrect.xml to define our custom shape.
Include View using the custom shape, with android:background="@drawable/roundrect".
Related: Implement shape of oval using XML

Create /res/drawable/roundrect.xml to define our custom shape.
<?xml version="1.0" encoding="utf-8"?>
<shape
    xmlns:android="http://schemas.android.com/apk/res/android"
    android:shape="rectangle">
    <corners
        android:radius="15dp" />
    <gradient
        android:angle="90"
        android:startColor="#FF000000"
        android:endColor="#FFFFFFFF"
        android:type= "linear" />
    <stroke
        android:width="1dp"
        android:color="#FF000000" />
    <padding
        android:left="15dp"
        android:top="15dp"
        android:right="15dp"
        android:bottom="15dp" />
</shape>
Include View using the custom shape, with android:background="@drawable/roundrect".
<LinearLayout xmlns:android="http://schemas.android.com/apk/res/android"
    xmlns:tools="http://schemas.android.com/tools"
    android:layout_width="match_parent"
    android:layout_height="match_parent"
    android:orientation="vertical"
    android:padding="10dp"
    tools:context=".MainActivity" >

    <TextView
        android:layout_width="wrap_content"
        android:layout_height="wrap_content"
        android:text="@string/hello_world" />

    <LinearLayout
        android:layout_width="match_parent"
        android:layout_height="match_parent"
        android:orientation="vertical"
        android:background="@drawable/roundrect" >

        <ImageView
            android:layout_width="wrap_content"
            android:layout_height="wrap_content"
            android:src="@drawable/ic_launcher"
            android:background="@drawable/roundrect" />
        <TextView
            android:layout_width="match_parent"
            android:layout_height="wrap_content"
            android:text="normal TextView"
            android:layout_margin="5dp" />
        <TextView
            android:layout_width="match_parent"
            android:layout_height="wrap_content"
            android:text="TextView with roundrect"
            android:layout_margin="5dp"
            android:background="@drawable/roundrect" />
        <EditText
            android:layout_width="match_parent"
            android:layout_height="wrap_content"
            android:hint="normal EditText"
            android:layout_margin="5dp" />
        <EditText
            android:layout_width="match_parent"
            android:layout_height="wrap_content"
            android:hint="EditText with roundrect"
            android:text="Hello"
            android:layout_margin="5dp"
            android:background="@drawable/roundrect" />
    </LinearLayout>

</LinearLayout>
Related: Implement shape of oval using XML
android.widget.Space
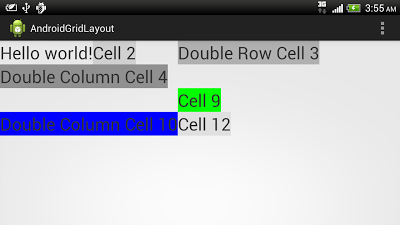
android.widget.Space added in API level 14, is a lightweight View subclass that may be used to create gaps between components in general purpose layouts.
Example:
Example:
<GridLayout xmlns:android="http://schemas.android.com/apk/res/android"
    xmlns:tools="http://schemas.android.com/tools"
    android:layout_width="match_parent"
    android:layout_height="match_parent"
    android:columnCount="3"
    tools:context=".MainActivity" >

    <TextView
        android:textSize="28sp"
        android:text="@string/hello_world" />
    <TextView
        android:textSize="28sp"
        android:background="#D0D0D0"
        android:text="Cell 2" />
    <TextView
        android:textSize="28sp"
        android:background="#B0B0B0"
        android:layout_rowSpan="2"
        android:text="Double Row Cell 3" />
    <TextView
        android:textSize="28sp"
        android:background="#909090"
        android:layout_columnSpan="2"
        android:text="Double Column Cell 4" />
    <Space
        android:layout_columnSpan="2" />
    <TextView
        android:textSize="28sp"
        android:background="#00FF00"
        android:text="Cell 9" />
    <TextView
        android:textSize="28sp"
        android:background="#0000FF"
        android:layout_columnSpan="2"
        android:text="Double Column Cell 10" />
    <TextView
        android:textSize="28sp"
        android:background="#E0E0E0"
        android:text="Cell 12" />
</GridLayout>
GridLayout
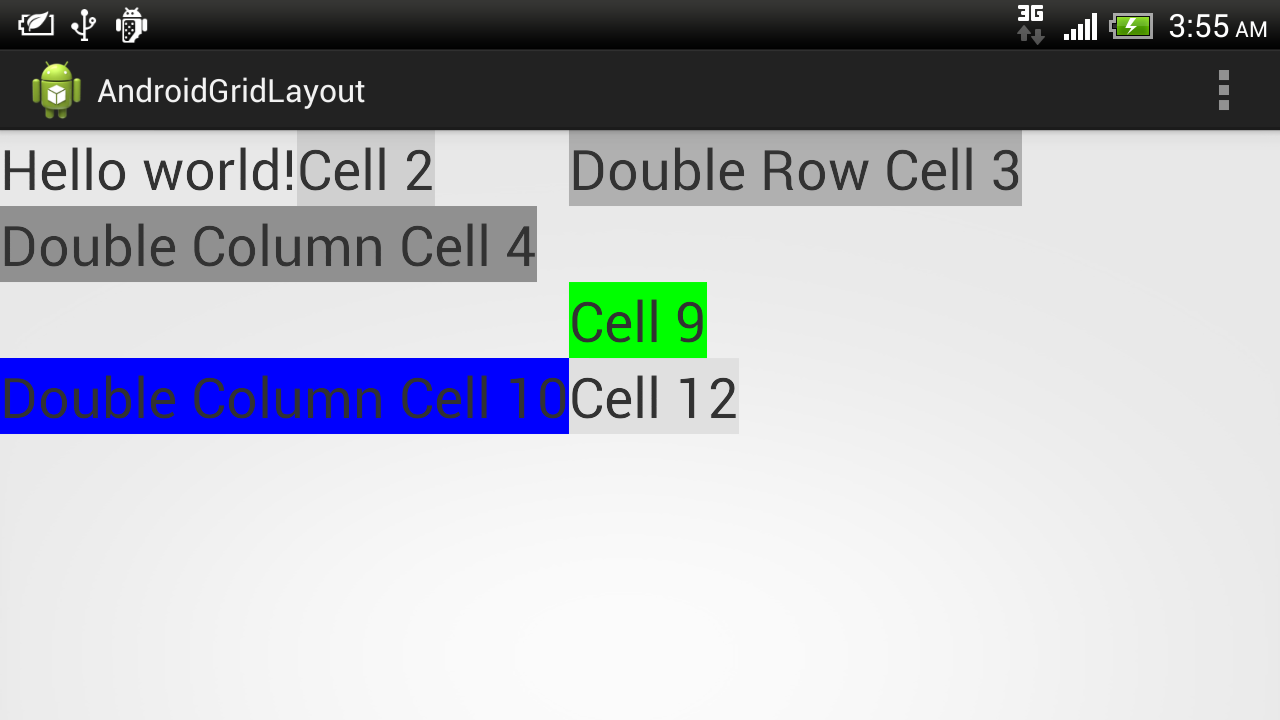
android.widget.GridLayout added in API level 14, is a layout that places its children in a rectangular grid.
Example:

Example:
<GridLayout xmlns:android="http://schemas.android.com/apk/res/android"
    xmlns:tools="http://schemas.android.com/tools"
    android:layout_width="match_parent"
    android:layout_height="match_parent"
    android:columnCount="3"
    tools:context=".MainActivity" >

    <TextView
        android:textSize="28sp"
        android:text="@string/hello_world" />
    <TextView
        android:textSize="28sp"
        android:background="#D0D0D0"
        android:text="Cell 2" />
    <TextView
        android:textSize="28sp"
        android:background="#B0B0B0"
        android:layout_rowSpan="2"
        android:text="Double Row Cell 3" />
    <TextView
        android:textSize="28sp"
        android:background="#909090"
        android:layout_columnSpan="2"
        android:text="Double Column Cell 4" />
    <TextView
        android:textSize="28sp"
        android:background="#505050"
        android:text="Cell 7" />
    <TextView
        android:textSize="28sp"
        android:background="#FF0000"
        android:text="Cell 8" />
    <TextView
        android:textSize="28sp"
        android:background="#00FF00"
        android:text="Cell 9" />
    <TextView
        android:textSize="28sp"
        android:background="#0000FF"
        android:layout_columnSpan="2"
        android:text="Double Column Cell 10" />
    <TextView
        android:textSize="28sp"
        android:background="#E0E0E0"
        android:text="Cell 12" />
</GridLayout>

Get bearing between two location using android.location.Location
android.location.Location provide bearingTo(Location dest) method the approximate initial bearing in degrees East of true North when traveling along the shortest path between this location and the given location. The shortest path is defined using the WGS84 ellipsoid. Locations that are (nearly) antipodal may produce meaningless results.
Example:
Example:
      //Get the current location
      Location startingLocation = new Location("starting point");
      startingLocation.setLatitude(myMap.getCameraPosition().target.latitude);
      startingLocation.setLongitude(myMap.getCameraPosition().target.longitude);

      //Get the target location
      Location endingLocation = new Location("ending point");
      endingLocation.setLatitude(<target>.latitude);
      endingLocation.setLongitude(<target>.longitude);

      //Find the Bearing from current location to next location
      float targetBearing = startingLocation.bearingTo(endingLocation);
الاشتراك في:
الرسائل (Atom)