How to Root Samsung S6 and S6 Edge On Android 6.0.1 Marshmallow

Since Samsung has released the official android 6 Marshmallow update for the Galaxy S6 SM-G920F and Galaxy S6 Edge SM-G925F, root solution for these devices is probably the next concern.
Oh! If you are yet to update your phone, the update can be obtained via OTA. Just go to Settings > About Device > Software Update and tap on Update Now. If the update is available for your device and region, you will be able to download and install it. If not, then you can see here: How to Download and Flash Marshmallow firmware on the Galaxy S6 and S6 Edge.

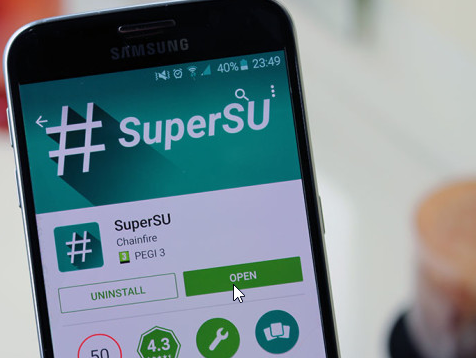
Now, if you updated your Samsung Galaxy S6, you can make it even better by rooting it and installing SuperSU.
With root access, you can use apps that you cannot normally use, backup and restore applications and improve the performance by overclocking the processor only to mention a few.

How to root official Galaxy S6 & S6 Edge Marshmallow Firmware

Download Requirement:
Download SpaxeX kernel for Galaxy S6 SM-G920F here and Galaxy S6 edge SM-G925F here.
Download SuperSU 2.65 APK
Download Odin v3.10.7 here

How to Root Samsung S6 and S6 Edge On Marshmallow Firmware

1. Download the SpaceX kernel and move it to a folder on your computer.

2. Download SuperSU and move the APK file to your phone’s internal storage.

3. Download Odin as well and extract the zip file onto your PC.

4. Now, boot the phone to download mode;
How to Boot S6 and S6 Edge to Download Mode
i. Turn off your phone. ii. Press the home, power and volume down buttons at the same time to go to download mode.
5. Connect your phone to your computer using a USB cable.

6. Lunch Odin as Admin, click on AP/PDA and select the SpaceX kernel file (SpaceX-Kernel_MM_RC1_G920F_Test.tar.md5 or SpaceX-Kernel_MM_RC1_G925F_Test.tar.md5) depending on your device.

7. Wait for the kernel to install and ODIN displays PASS.

8. Wait for the phone to restart. Open your file manager and install SuperSU APK you downloaded.
Pronto! Your Samsung Galaxy S6 and S6 Edge is rooted!

Advertisement

Similar Tutorials


Install Official Android 6.0.1 Marshmallow Update On Samsung S6 and S6 Edge

The need for wait is over as Samsung made the update for the Samsung Galaxy S6 and S6 Edge global just recently following the brief test-release made available in Korea and Europe respectively.

The first country to receive the Android 6.0.1 update is the UK on the Vodafone network. If you have a Samsung Galaxy S6 SM-G920F or S6 edge SM-G925F in the UK with Vodafone, you can expect an OTA update any time soon (G920FXXU3DPB8 or G925FXXU3DPB8).

For peoples in countries like Nigeria, SamMobile has got you covered. You can download and flash the official Android 6.0.1 Marshmallow firmware update on your Galaxy S6 and S6 Edge without having to wait for the update by Samsung being pushed to your device.

Don't know how to install the update when you download it? Don't worry. I have got you covered. But wait, let's discuss what's new in the Android 6.0.1 update for these formal Samsung Flagships.

1.First of all, there is Google Now on Tap. This is a feature which brings up information by pressing and holding down the home button. The software will search and display most relevant results.

2. Project Doze, a feature which blocks unnecessary activities for better battery performance.

3. Other changes include a redesigned notification panel where the white color dominates, better control over app permissions.

How to Install Android 6.0.1 Marshmallow Firmware on Galaxy S6 & S6 Edge

Required files:Download Marshmallow firmware here: (SM-G920F & SM-G925F)
Download Odin v3.10.7
Download Samsung USB driver
Make sure your phone is charged up to 80% and you have a working USB cable

Proceed to this page: How to Flash Stock Firmware On Samsung Android Devices
Advertisement

Similar Tutorials


How to Recover Deleted Text Messages On your Phone SIM Card

Although, gone are the days when text messages are being saved on SIM cards on mobile phones -for that, thanks to the emergence of the smartphones. However, for the incredibly strong battery of these small phones (Oxygen and Java phones), you may never seize to seeing them in the market. Why? Because majority prefers to using them as second phone to containing business lines since most of them can withstand heavy and long calls.

Nevertheless, there is a major setback in using these phones, and that is their inability to store as many SMS as possible. Most of them save SMS on SIM card which contains not more than 50 SMSs at the most. Often times, you will have to delete some few messages to keep more coming in.

OK. What if in the process, you deleted an SMS, mistakenly or intentionally, and would want to recover the SMS? Here, I discuss how to recover deleted SMS messages on your SIM card. Regardless of how long back you have deleted it, this guide would help you recover the SMS message.

Steps to Recover Deleted SMS Messages On SIM Card(s)

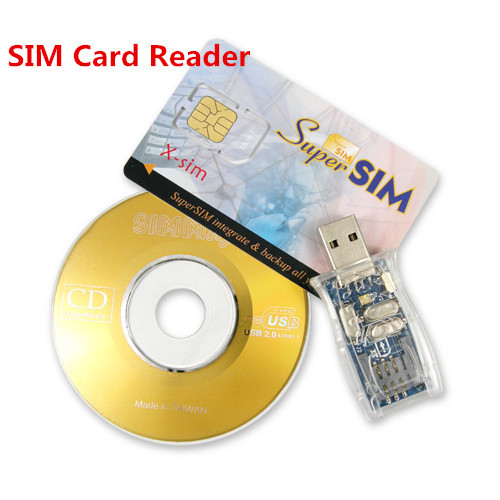
1. Purchase a USB SIM card reader.

2. Install the software application that comes with the SIM Card reader on your PC. If it doesn't come with any, download a good SIM Card manager. I recommend Compelson.

3. Remove the SIM Card from your phone and slot it in the SIM Card reader.

4. Plug the SIM Card reader (with SIM Card in it) in your PC.

5. Open the application you installed earlier and navigate through it.

6. From the application, go to File >> Read Text Messages. Alternatively, you may click on the Sync Button, if it's available on the program.
Almost immediately, a list of text messages will appear, both deleted and undeleted messages will appear.
The deleted ones will appear in red ink
7. You may undelete the deleted messages (ones in red ink) by right-clicking it and select Undelete.

Advertisement

Similar Tutorials


Tecno S9 and S9s Custom ROM Download | MiUi, Android 4.2.2 | Maryk OS v1.1

Tecno S9 and S9s are one of the oldest Tecno tab still available. Although, these tabs may seem out of the box, Maryk OS will give your Tecno S9 and S9s a modern look with much recent features and functionalities from MiUi v4.

About Maryk OS Custom ROM for Tecno S9 and S9s

Maryk OS for Tecno S9 and S9s is an android 4.2.2 custom ROM built from source based on the MiUi v4 codes.
With close to perfection, this ROM is built to give your Tecno S9 and S9s a smoother, faster and better battery life experience.

Although, these ROM have not been extensively tested on the devices because I do not have device to test it on, I simply rely on the comments and reports submitted by few peoples who have used this ROM on both Tecno S9 and S9s prior to the v1.1 release.
The ROM featured all the apps, functions and features of all MiUi v4 ROMs plus more.

How to Install Maryk OS On Tecno S9 and S9s

1. Flash custom recovery on your Tecno S9 or S9s. CWM? or TWRP? is better. See here: How to Create and Flash CWM Recovery on MTK Android Devices.

2. Perform a complete backup of your current ROM using your preferred custom recovery.

3. Download Maryk OS for your Tecno S9 from here or Tecno S9s from here.

4. Download Android 4.2.2 GApps from here.

5. Move both the ROM and the GApps to the root of your SDcard.

6. From the recovery, Wipe Data/Factory Reset, Wipe Cache, Wipe Delvik.

7. Flash Maryk OS by selecting Install from SDCard, then navigate to the ROM location and selelct it.
NOTE: Flash the GApps immediately after flashing the ROM.

8. Reboot your device and enjoy!

UPDATES:

1. Updates on this ROM will always be available here. Visit often for the latest updates on the ROM.
2. Your comments and feedback will highly help me in improving the ROM. Kindly say something.

Thank you!
Advertisement

Similar Tutorials


Counter Strike: Source Download | Java Game | Shooter

Counter Strike: Source is one of the best shooter games for java phones. Your mission is to save the community by preventing the enemies from detonating a bomb that had been planted already.

In the game, Counter Strike: Source - fight between good and evil is on. The criminals would want to use every known their tricky plots to detonate the bomb. Whereas, your mission is to find and remove the threat. As a strategy, you can part with the enemies at any time and in sodoing, try to evacuate the bomb.

Counter Strike: Source does not require cache file so, there is no need to specify cache directory for the game on your phone.

Download Counter Strike: Source for your Phone here.

Advertisement

Similar Tutorials


Dungeon Heroes: The Board Game Download | iOS Game | Adventure

Dungeon Heroes: The Board Game is a multiplayer strategic game available on iPhone (ipa) and android (apk). In the game, yourself and your opponent strives to be the best player in the Dungeon by planting traps, obstacles and monsters that derail or otherwise, hinder each other stands.

The Dungeon Heroes: The Board Game gets you absorbed in contest with your friends. The task of a player is to go down the dungeon, place traps, obstacles and monsters. Your opponent will win and become a hero if he copes with all the trials and reveals your strategy otherwise, you become the hero and the master planner!
Dungeon Heroes Game iOS

Dungeon Heroes: The Board Game does not require cache file so, there is no need to specify cache directory or jailbreak for the game on your iPhone and iPad.

Download Dungeon Heroes: The Board Game for your iPhone and iPad here.

Advertisement

Similar Tutorials


Minecraft Pocket Edition Download | iOS Game | 3D Game

Minecraft is one of those games that helps you improve your creativity by means of indulging you in activities that require your creative skills. Minecraft is available on PCs, Android (apk) and iPhone (ipa). An earlier and emmulated version of the Minecraft game is also available for some java phones.

Build everything you can imagine! By exploring your imagination, you can create things by your fantasy in the Minecraft game. In the game, you can create different worlds as a whole. From perfectly constructed plans to a complete building, Minecraft allows you to carry out the constructions all the way. Create masterpiece in a trip by blocks, during meetings with friends, an outdoor recreation; opportunities to explore are infinite. The Pocket edition of the Minecraft game on your iPhone brings the complete experience of Minecraft for PC to your pocket so that you may enjoy Minecraft game on your iPhone and, everywhere you go.
Minecraft Pocket Edition iOS Game

Minecraft Pocket Edition does not require cache file so, there is no need to specify cache directory or jailbreak for the game on your iPhone and iPad.

Download Minecraft Pocket Edition for your iPhone and iPad here.

Advertisement

Similar Tutorials


How to Write IMEI On SpreadTRUM Android: iTel and Others

SpreadTRUM android are android devices powered with SpreadTRUM chipset. You may need to write IMEI on SpreadTRUM android devices when you it writes NULL or Invalid IMEI. The process of writing new IMEI on the device will help you repair the NULL or Invalid IMEI that your SpreadTRUM android device writes.

Earlier, I have discussed how to write new IMEI on iTel and other SpreadTRUM android devices using this tool; SpreadTRUM Android WriteIMEI Tool.
Here, I will further discuss how to write and repair your SpreadTRUM android devices' IMEI.

Before you proceed, make sure that you have SpreadTRUM ADB Drivers installed. Download a good Universal fastboot and ADB Driver from here.
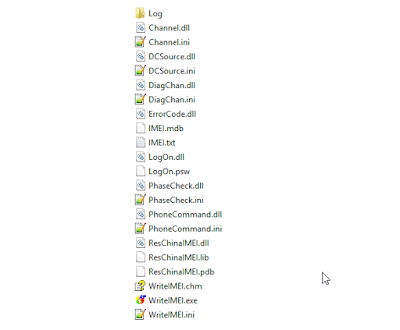
1. Download WriteIMEI Tool from here and extract it onto a folder on your PC.

2. Open the folder wherein you have extracted the WriteIMEI Tool you downloaded above. You should see the folder similar to the one below.

3. Open WriteIMEI.exe (preferrably, as Admin).

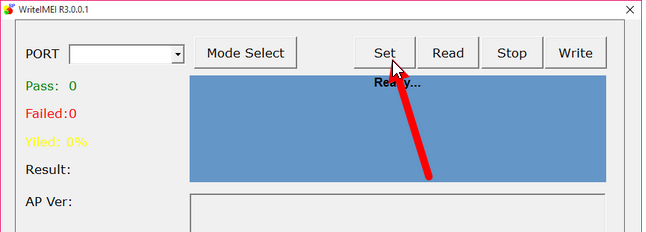
4. On WriteIMEI Screen, select the mode from which you wish to operate. Thus, click on Mode Select and choose Normal Mode.


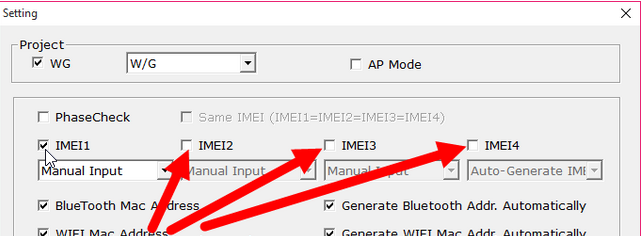
5. Click Set and select the list of the IMEI you wish to write.

Setup the next WriteIMEI screen as seen in the image below and based on your choice of phone. Thus, if you are working on a phone that has 2,3 or 4 SIMs.

6. Choose Manual Input (if you have IMEI to write) or, Auto (if you want WriteIMEI to generate IMEI for you).

7. Click Save to continue.

8. Under Input IMEI1 option, write the 15 digit IMEI code you wish to write on the phone.

9. Connect your SpreadTrum android device to the PC. NOTE: Make sure that USB Debbugging is enabled on the device.

10. Now, click Write Button to begin writing the IMEI on your SpreadTRUM android device.

11. A green ink will fill the space, indicating that the process is successfully completed.

Advertisement

Similar Tutorials


Gods of Egypt: Secrets of the lost kingdom Download | Android Game | Adventure

Gods of Egypt game (apk) is now available for download on android devices. This game, Gods of Egypt, gives a complete experience on the movie. Thus, aside the fun of playing the game, the entire views and actions in the movie keeps thundering in your head.

Gods of Egypt: Secrets of the lost kingdom android game features all the heroes and villains in the movie.
In the game, you help Horus, Egyptian god of the sky, and his companion Bek Fight the evil god Seth and his minions. This game for Android is based on same name movie. God Horus challenges sinister Seth who killed Osiris, Horus's father. Gore is joined by a young thief who wants to get rid of the curse and save his love.
Gods of Egypt Game

Help heroes in their dangerous adventures. Travel through lands of the Ancient Egypt and fight huge monsters and other Seth's servants. Use divine powers and combat skills to accomplish your mission.

Gods of Egypt: Secrets of the lost kingdom is a heavy game with cache file and the cache file directory is sdcard/Android/obb/
See: How to Install Cache Games on Android Devices for Details

Download Gods of Egypt: Secrets of the lost kingdom for your android device here.

Advertisement

Similar Tutorials


Windows 8 and Windows 8.1 Serial and Product Key for All Editions

A product key which is also known as serial key is a 25-character code that's used to activate Windows. The activation process helps verify that the Windows hasn't been used on more PCs than the Microsoft Software License Terms allow.

Your product key is on a card inside the box that the Windows DVD came in—or in an email that shows that you bought Windows.

Windows Product Key Format: PRODUCT KEY: XXXXX-XXXXX-XXXXX-XXXXX-XXXXX.
It's a good idea to have a copy of your Windows Prouct Key saved in a safe place in case you ever need to reinstall Windows for any reason in the future.

In the event that you need to install Windows and you do not have a valid Windows Serial Key or Product Key to use, here, I have compiled 100% Working Windows 8 and Windows 8.1 serial key for you.
Windows 8 Installation Setup

All the Windows 8 and Windows 8.1 Product Key and Serial Numbers contained on this page have been tested working on Windows 8 and Windows 8.1 PCs. Simply choose the appropriate Serial number and insert it where your PC asks for Windows Product Key.

Windows 8.1 Serial Key : Ultimate Edition

NTTX3-RV7VB-T7X7F-WQYYY-9Y92F

Windows 8 OS Key : Professional Edition

XKY4K-2NRWR-8F6P2-448RF-CRYQH

Windows 8 OS Product Key : Release Preview

TK8TP-9JN6P-7X7WW-RFFTV-B7QPF

Windows 8 OS Product Serial Number : Consumer Preview

DNJXJ-7XBW8-2378T-X22TX-BKG7J

Windows 8 OS Serial Key : Developer’s Preview

6RH4V-HNTWC-JQKG8-RFR3R-36498

Windows 8 Product/Serial Key : Developer’s Version

Y8N3-H7MMW-C76VJ-YD3XV-MBDKV
6RH4V-HNTWC-JQKG8-RFR3R-36498
4Y8N3-H7MMW-C76VJ-YD3XV-MBDKV
MBFBV-W3DP2-2MVKN-PJCQD-KKTF7
28VNV-HF42G-K2WM9-JXRJQ-2WBQW
NF32V-Q9P3W-7DR7Y-JGWRW-JFCK8

Windows 8 Serial Key : English

DNJXJ-7XBW8-2378T-X22TX-BKG7J

Windows 8 OS Serial Key : Chinese

DNJXJ-7XBW8-2378T-X22TX-BKG7J

Windows 8 Serial Number : German

DNJXJ-7XBW8-2378T-X22TX-BKG7J

Windows 8 Serial Number/Key : French

DNJXJ-7XBW8-2378T-X22TX-BKG7J

Windows 8 Product Key : Japanese

DNJXJ-7XBW8-2378T-X22TX-BKG7J

Window 8 Serial Keys 100 % Working: General

All the following Serial Key have been tested working on Windows 8. Only few of them works with Windows 8.1

2GVN8-TV3C2-K3YM7-MMRVM-BBFDH
967N4-R7KXM-CJKJB-BHGCW-CPKT7
84NRV-6CJR6-DBDXH-FYTBF-4X49V
RRYGR-8JNBY-V2RJ9-TJP4P-749T7
ND8P2-BD2PB-DD8HM-2926R-CRYQH
XWCHQ-CDMYC-9WN2C-BWWTV-YY2KV
BDDNV-BQ27P-9P9JJ-BQJ96-KTJXV
KNTGM-BGJCJ-BPH3X-XX8V4-K4PKV
F8X33-CNV3F-RH7MY-C73YT-XP73H
967N4-R7KXM-CJKJB-BHGCW-CPKT7
HNRGD-JP8FC-6F6CY-2XHYY-RCWXV
84NRV-6CJR6-DBDXH-FYTBF-4X49V
BDDNV-BQ27P-9P9JJ-BQJ96-KTJXV
CDQND-9X68R-RRFYH-8G28W-82KT7
DWV49-3GN3Q-4XMT7-QR9FQ-KKT67
F2M4V-KFNB7-9VVTW-MVRBQ-BG667
F8X33-CNV3F-RH7MY-C73YT-XP73H
GPTCC-XN297-PVGY7-J8FQY-JK49V
HV3TW-MMNBG-X99YX-XV8TJ-2GV3H
J6FW2-HQNPJ-HBB6H-K9VTY-2PKT7
KQWNF-XPMXP-HDK3M-GBV69-Y7RDH
MMRNH-BMB4F-87JR9-D72RY-MY2KV
N4WY8-DVW92-GM8WF-CG872-HH3G7
ND8P2-BD2PB-DD8HM-2926R-CRYQH
RRYGR-8JNBY-V2RJ9-TJP4P-749T7
VHNT7-CPRFX-7FRVJ-T8GVM-8FDG7
84NRV-6CJR6-DBDXH-FYTBF-4X49V
BDDNV-BQ27P-9P9JJ-BQJ96-KTJXV
967N4-R7KXM-CJKJB-BHGCW-CPKT7
KQWNF-XPMXP-HDK3M-GBV69-Y7RDH
F2M4V-KFNB7-9VVTW-MVRBQ-BG667
CR8NP-K37C3-MPD6Q-MBDDY-8FDG7
39DQ2-N4FYQ-GCY6F-JX8QR-TVF9V
VHNT7-CPRFX-7FRVJ-T8GVM-8FDG7
GPTCC-XN297-PVGY7-J8FQY-JK49V
HV3TW-MMNBG-X99YX-XV8TJ-2GV3H
CDQND-9X68R-RRFYH-8G28W-82KT7
7HBX7-N6WK2-PF9HY-QVD2M-JK49V
D32KW-GNPBK-CV3TW-6TB2W-K2BQH
NBWPK-K86W9-27TX3-BQ7RB-KD4DH
2NF99-CQRYR-G6PQ9-WYGJ7-8HRDH
F7BDM-KTNRW-7CYQP-V98KC-W2KT7
4JKWV-MNJCY-8MW3Q-VJYGP-DC73H
KQWNF-XPMXP-HDK3M-GBV69-Y7RDH
MMRNH-BMB4F-87JR9-D72RY-MY2KV
N4WY8-DVW92-GM8WF-CG872-HH3G7
ND8P2-BD2PB-DD8HM-2926R-CRYQH
RRYGR-8JNBY-V2RJ9-TJP4P-749T7
FFX8D-N3WMV-GM6RF-9YRCJ-82KT7
2CMGK-NMW4P-B846H-YXR6P-27F9V
D2GBF-NGBW4-QQRGG-W38YB-BBFDH
NTVHT-YF2M4-J9FJG-BJD66-YG667
GBJJV-YNF4T-R6222-KDBXF-CRYQH
4NMMK-QJH7K-F38H2-FQJ24-2J8XV
84NRV-6CJR6-DBDXH-FYTBF-4X49V
3NHJ7-3WWQK-4RFTH-8FHJY-PRYQH
988NM-XKXT9-7YFWH-H2Q3Q-C34DH
TGXN4-BPPYC-TJYMH-3WXFK-4JMQH
N9C46-MKKKR-2TTT8-FJCJP-4RDG7
Q4NBQ-3DRJD-777XK-MJHDC-749T7
2VTNH-323J4-BWP98-TX9JR-FCWXV
D7KN2-CBVPG-BC7YC-9JDVJ-YPWXV
2GVN8-TV3C2-K3YM7-MMRVM-BBFDH
4NMMK-QJH7K-F38H2-FQJ24-2J8XV
76NDP-PD4JT-6Q4JV-HCDKT-P7F9V
7HBX7-N6WK2-PF9HY-QVD2M-JK49V

Advertisement

Similar Tutorials


Unlimited Free Torrent Files Download On your Android Device: Vuze Torrent App

Although, there are lots of VPN Clients in the Google Play Store which you can download and use on your android device for free but, only few of them delivers what they actually promise; fast download!

Vuze Torrent app is the best torrent application in the Google Play Store for downloading files from Torrents sites. It has all the features you can find in any other torrent applications plus more. The best part of it? It is FREE!

Using VUZE for the first time, I was able to download about 1.02GB file in less than 120secs. That's right. It's about 2mins. Want to know the network I used? Yes. It's in Nigeria and that was Glo. It's incredible! Isn't it? That's exactly how VUZE captured my interest in it.

How Does Vuze work?

Just like every other torrent applications, VUZE is being used to downloading torrent files. However, unlike other torrent apps, to use Vuze, you do not need to create any account. Just download it and start using it immediately.

What Can you Do with Vuze?

Torrents File Search: right from within the Vuze app, you can type the name of the files you wish to download and the search query will open up in your default browser (mostly, it asks you to select) the browser you wish to use.

Pause and Resume Feature: using Vuze, you can pause and resume any and all files you are currently downloading and resume the download at a later time or date.

Magnet Links: Vuze can automatically trigger whenever you click on any torrent download link from any apps including your browsers, and mail clients on your android device.

Download VUZE VPN from here. (Play Store Link)

Advertisement

Similar Tutorials


Rescue: Strike Back Download | Android Game | Shooter

Rescue: Strike back is one of the most interesting shooter android game to play with fantastic true-color 3D experience. In this game, you are provided with an arsenal wherein your weapons can be renewed.

To play Rescue: Strike back, you go through rooms of a secret military lab. Destroy alien monsters using fantastic weapons. In this game, on Android you have to clear a secret military facility where biological experiments were conducted. Monsters broke free and now threaten the mankind.
Discretely infiltrate the enemy base and obtain sensitive information. Eliminate enemy bosses using a powerful sniper rifle. Save the survivors. Use high-tech armor and weapons from the arsenal.

Rescue: Strike back is a heavy game with cache file and the cache file directory is sdcard/Android/obb/.
See here: How to Install Cache Games On Android Devices for details.

Download Rescue: Strike back for your android device here.

Advertisement

Similar Tutorials


Rising Empires Premium Download | Android Game | Adventure

Rising empires premium is an android game that falls in the category of adventure games. Rising Empire Premium is one of those games that help improve your creativity while still catching your interest.

Rising empires premium - you play this game by creating your own powerful empire. Build and improve cities, gather resources, explore new technology and create a powerful army which can be to conquer the world and expand the boundaries of your empire.In this world, life prevails not only on the surface of the earth, inhabited by humans and elves, but also in vast underground caverns, where gnomes and other mysterious people live.
Choose one of available races, each with unique types of buildings, military units, etc. Fight turn-based battles on the surface and under the ground until victory!

Rising empires premium is not a heavy game with cache file therefore, no cache file directory needs to be set but it is a paid game.

Download Rising empires premium for your android device here.

Advertisement

Similar Tutorials


Maze runner: The scorch trials Download | Android Game | Runner

Maze runner: The scorch trials is an interesting-but-not-too-known runner game for android devices. This Android game is based on the eponymous film. The game lets you create a team of your favorite runners, each with unique characteristics.

Maze runner: The scorch trials - since this game is a runner game, your ultimate goal is to guide the runner through dangerous tracks with various traps and obstacles. Collect gold coins and bonuses. So, just choose one of the heroes and guide him through the post-apocalyptic world.
Run forward at full speed. Jump over gaps and pits. Go around various obstacles. Find the way through a deadly maze. Buy items and different costumes for your characters successfully!

Maze runner: The scorch trials is not a heavy game with cache file therefore, no cache file directory needs to be set.

Download Maze runner: The scorch trials for your android device here.

Advertisement

Similar Tutorials


FIFA 2016: Ultimate Team Download | Android Game | Soccer

FIFA 16: Ultimate Team is the latest edition of the all-time popular and one of the most wanted soccer games for android devices. This edition is the has lots of goodies and features yet featured in earlier editions.

In FIFA 16: Ultimate team, you can create your own dream team made out of world's best players most of which are featured in the game. Take part in different championships. Become the coach of the world's best football team in this game all at the comfort of your palm or lap; whichever case, on your android device.
You can also customize your team players to your liking e.g by selecting a Uniform colors. Buy and sell players and try to get a perfectly balanced composition of the team. Exchange unwanted players for valuable prizes. Control the actions of your team on the field.

FIFA 16: Ultimate team is a heavy game with cache file and the cache file directory is sdcard/Android/obb/
See: How to Install Cache Games on Android Devices for Details

Download FIFA 16: Ultimate team for your android device here.

Advertisement

Similar Tutorials


Common SP Flash Tool Error Codes and Solutions

SP Flash Tool is probably the commonest tool for flashing MTK Android devices today. These MTK Android devices include Tecno, Infinix, Gionee, Gowin, PELL, Wiko and the likes. Earlier, we have discussed how to flashing different MTK android devices using SP Flash Tool. Today, we will discuss various error code(s) you may encounter in SP Flash, their meanings and how to override them.

We discussed the following SP Flash Tool error codes. Simply CLICK any error code below to JUMP the page to the one(s) that apply to you:
Error 5054, Error 4032, Error 8038, Error 5069, Error 4001, Error 4008, Error 3149, Error 3168, Error 2004, Error 1013, Error 2020, Error 5007, Error 4010, Error 3182, Error 6012, Error 1042, Error 2, Error 2005, Error 4058, Error 3178, Error 8406, Error 1012, Error 3140, Error 8417, Error 1002, Error 1011, Error 1022, Error 1040, Error 2035, Error 3001, Error 3012, Error 4050, Error 5054, Error 5066, Error 8200

Error 5054

SP Flash Error Message: GET_DRAM_SETTINGS_FAIL (5054)
Error Code Meaning: the flash files you are attempting to flash is a wrong file and not compatible with the device you are attempting to flash them on.

SOLUTION:
1. Check that you are flashing with the correct flash files.
2. If the flash files are confirmed to be correct, format the phone using SP Flash Tool and flash again.

Error 4032

SP Flash Error Message: S_FT_ENABLE_DRAM_FAIL (4032) [EM] ENABLE DRAM FAIL
Error Code Meaning: SP Flash Tool is having difficulties communicating with the device due to DRAM Failure.

SOLUTION:
1. Check that you have ticked only the files present in the ROM you want to flash.
2. Check that you have the correct drivers installed.
3. Delete SP Flash Tool driver and then, extract it again.
4. Attemp using the latest SP Flash Tool.
5. Make sure you are using the correct flash files for the phone you are flashing.
6. Format the phone using SP FLASH Tool. NOTE: Use the default format option in SP Flash Tool.

Error 8038

SP Flash Error Message: ERROR 8038! Android Download PMT is ready and layout has been changed.
Error Message Meaning: SP Flash Tool could not write to certain partitions on the device due incompatibilities.

SOLUTION:
1. Format the phone in SP Flash Tool. NOTE: Use the default format option in SP Flash Tool.
2. Open scatter file using Notepad++ and change __NODL_FAT to FAT by removing the "__NODL_"

Error 5069

SP Flash Error Message: SDL_PMT_ERR_NO_SPACE (5069)
Error Code Meaning: the size of the flash file to be flashed is larger than the partition size.
SOLUTION:
1. Check that the file you are flashing is the same as the device.
2. Try another stock ROM.

Error 4001

SP Flash Error Message: S_FT_DA_NO_RESPONSE or (4001)
Error Code Meaning: SP Flash could not communicate with the device.

SOLUTION:
1. Switch the USB Port.
2. Run SP Flash Tool as admin.
3. Check that your drivers are properly installed.
4. Check that the battery in the device is charged and that it is switched off.

Error 4008

SP Flash Error Message: BROM ERROR : S_FT_DOWNLOAD_FAIL (4008)
Error Code Meaning: SP Flash Tool encounter error during flashing initialization.

SOLUTION:
1. Switch USB Port.
2. Try with higher version of SP Flash Tool.
3. Ensure that there is battery in the device and that it is charged.
4. Format the phone using SP Flash tool. NOTE: Use the default format option in SP Flash Tool.

Error 3149

SP Flash Error Message: BROM ERROR: S_DA_SDMMC_WRITE_FAILED (3149)
Error Code Meaning: SP Flash Tool could NOT flash the phone.

SOLUTION:
1. Run SP Flash Tool as admin.
2. Try with the latest SP Flash Tool.
3. Try another ROM.
4. Try another PC.
5. Try another USB Cord.
6. Format the phone using SP Flash before flashing. NOTE: Use the default format option in SP Flash Tool.

Error 3168

SP Flash Error Message: BROM ERROR : S_CHIP_TYRE_NOT_MATCH (3168)
Error Code Meaning: There is conflict in the information stored in the scatter file and the phone's.

SOLUTION:
1. Check that you are using the correct stock ROM.
2. Try a higher version of SP Flalsh Tool.

Error 2004

SP Flash Error Message: BROM ERROR : S_FT_DOWNLOAD_FAIL (2004)
Error Code Message: The communication between SP Flash and the device was interrupted.

SOLUTION:
1. Try another USB Cord.
2. Lunch SP Flash as admin.
3. Try another PC.
4. Check that the battery in the device is charged.

Error 1013

SP Flash Error Message: BROM ERROR : S_COM_PORT_OPEN_FAIL (1013)
Error Code Meaning: The target port and the SP Flash Tool communication error.

SOLUTION
1. Try another port on the PC.
2. Check that your drivers are installed correctly.
3. Reinstall the drivers. See here: How to Install USB VCOM Drivers Correctly.
4. Try with another USB Cord.
5. Check the phone's USB Port.

Error 2020

SP Flash Error Message: BROM ERROR : S_BROM_CHKSUM16_MEM_RESULT_DIFF (2020)
Error Code Meaning: SP Flash could move flash files to the devices' SRAM.

SOLUTION:
1. Try with the latest version of SP Flash Tool.
2. Hold both Volume Buttons before connecting to the PC for flashing and release once flashing starts.
3. On SP Flash, go to Options >> Option >> Connection >> Battery and set it to "with battery".

SOLUTION:
1. Check that the scatter file is in the same directory as the other files to be flashed.
2. Check that you have marked ONLY files that are contained in the flash files.

Error 4010

SP Flash Error Message: BROM ERROR : S_FT_FORMAT_FAIL (4010)
Error Code Meaning: the block map in the scatter file does not match the device's partition sizes.

SOLUTION:
1. Try with the latest SP Flash TOOL.
2. Try with another firmware.

Error 3182

SP Flash Error Message: BROM ERROR : S_STORAGE_NOT_MATCH (3182)
Error Code Meaning: the ROM you are trying to flash is not for the target device.

SOLUTION:
1. Check that you are using the correct ROM.

Error 6012

SP Flash Error Message: BROM ERROR: S_SECURITY_SF_CODE_COMMAND_FORBIDDEN (6012), MSP ERROR CODE: 0X00
Error Code Meaning: the download agent in use is not compatible with the phone.

SOLUTION:
1. Set download agent to MTK_AllInOne_DA.bin. See here: How to set Download Agent in SP Flash.

Error 1042

SP Flash Error Message: BROM ERROR: S_TIMEOUT (1042)
Error Code Meaning: the flashing process took too long than usual.

SOLUTION:
1. Try with the latest SP Flash Tool.
2. Try flashing one partition at a time.
3. Try using a different PC and or, USB cord and port.

Error 2

SP Flash Error Message: BROM ERROR: ?? (2)
Error Code Meaning: SP Flash could not communicate with the device.

SOLUTION:
1. Try using different PC.
2. Use SP Flash in compatibility mode for Windows 7 or XP3.
3. Check that your drivers are correct and properly installed.
4. Try another USB Cord.

Error 2005


SP Flash Error Message: BROM ERROR: S_BROM_CMD_STARTCMD_FAIL (2005)
Error Code Meaning: the device powers on before SP Flash could initialize flashing process.

SOLUTION:
1. Try using a different USB Cord.
2. Run SP Flash Tool in compatibility mode for Windows 7 or XP3.
3. Check that the battery is charged.

Error 4058

SP Flash Error Message: BROM ERROR : S_FT_GET_MEMORY_FAIL (4058)
Error Code Meaning: SP Flash could not locate the partition you are trying to flash.

SOLUTION:
1. Do Not tick/mark partitions with blank file/item in SP Flash Tool.

Error 3178

SP Flash Error Message: BROM_ERROR_S_STORAGE_NOT_MATCH (3178)
Error Code Meaning: the flash files/ROM is not the same for the phone you are flashing.

SOLUTION:
1. Check that you are flashing with correct flash file.

Error 8406

SP Flash Error Message: SP FLASH TOOL ERROR (8406)
Error Code Meaning: some compatibility issues interrupting the flashing process.

SOLUTIONS:
1. Check that your drivers are correct and properly installed.
2. Try with another firmware.
3. Run SP Flash in compatibility mode for Windows 7 or XP3.

Error 1012

SP Flash Error Message: BROM ERROR: S_NOT_ENOUGH_MEMORY (1012)
Error Code Meaning: the version of SP Flash in use does not support the firmware file size(s).

SOLUTION:
1. Use the latest version of SP Flash Tool.

Error 3140

SP Flash Error Message: BROM ERROR: S_DA_UPDATE_BOOTLOADER_EXIST_MAGIC_NOT_MATCHED (3140)
Error Code Message: SP Flash encounter error flashing file to a non-specified partition.

SOLUTION:
1. Try using the latest version of SP Flash.
2. Format the device using SP Flash before you flash the device again.

Error 8417

SP Flash Error Message: BROM ERROR: Initialize scatter file failed. Please check the scatter file you load is legal. (8417)
Error Code Message: the format of the scatter file is invalid and not understood.

SOLUTION:
1. Open the scatter file with Notepad++. The scatter file must begin with:
#################################### #################################### ####################################
##General Setting#
If there is anything before that, delete it and save the scatter file and then, retry flashing the device again.
2. Try with another ROM/Firmware.

Error 1002

SP Flash Error Message: S_INVALID_ARGUMENTS (1002)
Error Code Meaning: the Scatter file present in the ROM you are attempting to flash is invalid.

SOLUTION:
1. Check that you are flashing using the correct firmare.
2. Try with another ROM.

Error 1011

SP Flash Error Message: S_NOT_ENOUGH_STORAGE_SPACE (1011)
Error Code Meaning: Occurs when the size of any part of the firmware is larger than the available pertition.

SOLUTION:
1. Check to confirm that you are using the correct firmware to flash the phone.
2. Use SP Flash to format the phone before flashing. NOTE: use the default FORMAT Options in SP Flash.

Error 1022

SP Flash Error Message: S_UNSUPPORTED_VER_OF_DA (1022)
Error Code Meaning: Occurs when the SP Flash in use is not supported by the firmware most likely; because the file size is too large for it to use.

SOLUTION:
1. Try with the latest SP Flash Tool.

Error 1040

SP Flash Error Message: S_UNSUPPORTED_OPERATION (1040)
Error Code Meaning: this occurs when the scatter file loaded is for another phone other than the phone to be flashed.

SOLUTION:
1. Check to confirm that you are using the correct firmware for flashing.
2. Try with another ROM from another source.

Error 2035

SP Flash Error Message: S_BROM_CMD_JUMP_DA_FAIL (2035)
Error Code Meaning: there is a communication error between the Device and SP Flash Tool.

SOLUTION:
1. Check that your drivers are properly installed.
2. Reinstall the drivers if necessary.
3. Try another USB Port.
4. Try another USB Cable.
5. Try another PC.
6. Use SP Flash in compatibility mode for Windows XP3 or 7.

Error 3001

SP Flash Error Message: S_DA_EXT_RAM_ERROR (3001)
Error Code Meaning: the communication between SP Flash and the device ends prematually.

SOLUTION:
1. Reconnect USB Cable.
2. Try with another USB or Port

Error 3012

SP Flash Error Message: NAND_FLASH_NOT_FOUND (3012)
Error Code Meaning: this occurs as a result of the memory error.

SOLUTION:
1. Use another version of SP Flash.
2. Try another computer.
3. Hold both volume buttons until flashing starts.

Error 4050

SP Flash Error Message: S_FT_NEED_DOWNLOAD_ALL_FAIL (4050)
Error Code Meaning: Occurs when PMT file size varies from the scatter file.

SOLUTION:1. Format the device with SP Flash before flashing the phone.
2. Use another version of SP Flash Tool.

Error 5054

SP Flash Error Message: S_INVALID_DA_FILE (5054)
Error Code Meaning: the download agent in use is not compatible for the device.

SOLUTION:
1. Change the download agent. See here: How to Set Download Agent on SP Flash Tool

Error 5066

SP Flash Error Message: S_DL_PC_BL_INVALID_GFH_FILE_INFOR... (5066)
Error Code Meaning: the scatter file in use is wrong for the device.

SOLUTION:
1. the same issues as Error 8417. Click here for the solution.

Error 8200

SP Flash Error Message: SP Flash Tool Error (8200)
Error Code Meaning: occurs when there is a wrong firmware in use.

SOLUTION:
1. Confirm that you are using the correct firmware.
2. Try with another ROM from another source.

Other Possible Errors and Solutions


1. Phone Stuck at Bootloop or Bootlogo after Flashing:
SOLUTION:
1. Insert a formatted SD Card in the phone before flashing.
2. Give up to 5 minutes before you assume it is an error
3. Boot the phone into factory mode and wipe data or factory reset it.
4. Try another ROM.

2. Device Shows White Screen or Strange Colours after Flashing:
SOLUTION:
1. Try with another ROM.

3. Phone Disconnecting During Flashing:
SOLUTION:
1. Try another USB Port.
2. Change USB Cord.
3. Try holding down both volume+ and volume- button or either of them while connecting to the PC and until the flashing starts.
4. Reinstall your USB VCOM drivers.

4. SP Flash Tool Stays at 0% and Phone Shows Charging:
SOLUTION:
1. Reinstall your USB VCOM Drivers. 2. Try another USB Port.
3. Run SP Flash in compatibility mode for Windows 7 or XP3.
4. Run SP Flash Tool as admin

5. Flashing Successful BUT, Phone Calibration Fail to Work:
SOLUTION:
1. Edit the scatter file with Notepad++ and remove the NODL__ and then, save. After that, reflash the phone again.

Advertisement

Similar Tutorials