keytool error: java.lang.Exception: Keystore file does not exist
If you have a new Android development setup on your system, and it's your first project, and you want to "display the SHA1 (or MD5) certificate fingerprint". May be you will get the error of:
keytool error: java.lang.Exception: Keystore file does not exist: /.../.android/debug.keystore
To generate the debug.keystore, you have to run any app at least one time. Just create and run any simple "Hello World" to generate it.
keytool error: java.lang.Exception: Keystore file does not exist: /.../.android/debug.keystore
To generate the debug.keystore, you have to run any app at least one time. Just create and run any simple "Hello World" to generate it.
Detect and animate to user location
Last exercise "Implement LocationSource and LocationListener for Google Maps Android API v2" to detect user location. We can modify onLocationChanged() method to animate to updated user location; such that the GoogleMap will always center on user location.
The series:
A simple example using Google Maps Android API v2, step by step.
 @Override
 public void onLocationChanged(Location location) {
  if (myLocationListener != null) {
   myLocationListener.onLocationChanged(location);

   double lat = location.getLatitude();
   double lon = location.getLongitude();

   tvLocInfo.setText(
     "lat: " + lat + "\n" +
     "lon: " + lon);

   LatLng latlng= new LatLng(location.getLatitude(), location.getLongitude());
   myMap.animateCamera(CameraUpdateFactory.newLatLng(latlng));

  }
 }
The series:
A simple example using Google Maps Android API v2, step by step.
Rename project after Existing Android Code Into Workspace
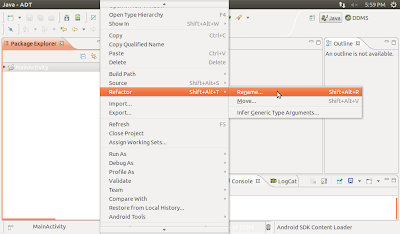
It's a tips in using Eclipse. After import Existing Android Code Into Workspace, the project name will be MainActivity, or the name of the main activity. In order to rename it, right click the project -> Refactor -> Rename...
Display another layout over GoogleMap
This example demonstrate how to place LinearLayout over GoogleMap, using XML.
The series:
A simple example using Google Maps Android API v2, step by step.
<RelativeLayout xmlns:android="http://schemas.android.com/apk/res/android"
    xmlns:tools="http://schemas.android.com/tools"
    android:layout_width="match_parent"
    android:layout_height="match_parent"
    android:orientation="vertical"
    tools:context=".MainActivity" >


    <fragment
        android:id="@+id/map"
        android:layout_width="match_parent"
        android:layout_height="match_parent"
        class="com.google.android.gms.maps.MapFragment"/>

    <LinearLayout
        android:layout_width="wrap_content"
        android:layout_height="wrap_content"
        android:orientation="vertical"
        android:background="#A0FFFFFF" >
        <TextView
            android:id="@+id/locinfo"
            android:layout_width="wrap_content"
            android:layout_height="wrap_content"/>
        <ImageView
            android:layout_width="wrap_content"
            android:layout_height="wrap_content"
            android:src="@drawable/ic_launcher" />

    </LinearLayout>

</RelativeLayout>
The series:
A simple example using Google Maps Android API v2, step by step.
Professional Android Open Accessory Programming with Arduino
Learn how to control your home or car from your Android smartphone - air conditioning, lights, entertainment systems, and more!
Android Open Accessory is a new, simple, and secure protocol for connecting any microcontroller-empowered device to an Android smartphone or tablet. This Wrox guide shows Android programmers how to use AOA with Arduino, the microcontroller platform, to control such systems as lighting, air conditioning, and entertainment systems from Android devices. Furthermore, it teaches the circuit-building skills needed to create games and practical products that also take advantage of Android technology.
- Introduces Android Open Accessory and shows how to set up the hardware and development environment
- Explains how to code both Android and Arduino elements of an accessory
- Features four complete projects developers can build using various sensors and indicators/actuators, including source code
- Gives Android developers the tools to create powerful, sophisticated projects
Professional Android Open Accessory with Android ADK and Arduino opens exciting new opportunities for Android developers.
Custom InfoWindowAdapter with dynamic icon
Last exercise demonstrate how to "implement custom InfoWindowAdapter", with fixed icon defined in XML. We can generate the icon dynamically in run-time.
To implement dynamic icon, modify layout of the info windows(custom_info_contents.xml) - remove the assigned android:src and assigne android:id="@+id/icon".
Modify getInfoContents(Marker marker) to load the icon in run-time.
The series:
A simple example using Google Maps Android API v2, step by step.
To implement dynamic icon, modify layout of the info windows(custom_info_contents.xml) - remove the assigned android:src and assigne android:id="@+id/icon".
<?xml version="1.0" encoding="utf-8"?>
<LinearLayout xmlns:android="http://schemas.android.com/apk/res/android"
    android:layout_width="wrap_content"
    android:layout_height="wrap_content"
    android:orientation="horizontal">

    <LinearLayout
        android:layout_width="wrap_content"
        android:layout_height="wrap_content"
        android:orientation="vertical">
        <ImageView
            android:id="@+id/icon"
            android:layout_width="wrap_content"
            android:layout_height="wrap_content"
            android:layout_marginRight="5dp"
            android:adjustViewBounds="true"/>
        <TextView
            android:id="@+id/title"
            android:layout_width="wrap_content"
            android:layout_height="wrap_content"
            android:textSize="12dp"
            android:textStyle="bold"/>
        <TextView
            android:id="@+id/snippet"
            android:layout_width="wrap_content"
            android:layout_height="wrap_content"
            android:textSize="10dp"/>
    </LinearLayout>

</LinearLayout>
Modify getInfoContents(Marker marker) to load the icon in run-time.
  @Override
  public View getInfoContents(Marker marker) {
   TextView tvTitle = ((TextView)myContentsView.findViewById(R.id.title));
   tvTitle.setText(marker.getTitle());
   TextView tvSnippet = ((TextView)myContentsView.findViewById(R.id.snippet));
   tvSnippet.setText(marker.getSnippet());

   ImageView ivIcon = ((ImageView)myContentsView.findViewById(R.id.icon));
   ivIcon.setImageDrawable(getResources().getDrawable(android.R.drawable.ic_menu_gallery));

   return myContentsView;
  }
The series:
A simple example using Google Maps Android API v2, step by step.
Google TV Add-on with emulator is available in Android SDK

Google TV SDK Add-on allows developers to create Google TV-specific Android Virtual Devices (AVDs) for the Android emulator. The Google TV Add-on package is available from the Android AVD and SDK Manager. To know more about Google TV Add-on and how to install, read GoogleTV Add-On doc.
You now have the Google TV Add-on. To learn how to run the emulator, see the section Using Emulator.
Load custom marker on GoogleMap V2
To load custom icon as marker of GoogleMap V2, save the icon in drawable folder. Load it using the code:
The series:
A simple example using Google Maps Android API v2, step by step.
  BitmapDescriptor bitmapDescriptor
   = BitmapDescriptorFactory.fromResource(R.drawable.ic_launcher);

  myMap.addMarker(new MarkerOptions()
        .position(point)
        .icon(bitmapDescriptor)
        .title(point.toString()));
The series:
A simple example using Google Maps Android API v2, step by step.
UPDATE NOW! Oracle JDK 7u11 released

Oracle releasdd JDK 7u11 to answer the the flaw in Java software integrated with web browsers.
This release contains fixes for security vulnerabilities. For more information, see Oracle Security Alert for CVE-2013-0422.
Java SE 7 Update 11 is available from the following download sites:
Oracle is aware of a flaw in Java software integrated with web browsers
Posted at +Oracle: Oracle is aware of a flaw in Java software integrated with web browsers. The flaw is limited to JDK7. It does not exist in other releases of Java, and does not affect Java applications directly installed and running on servers, desktops, laptops, and other devices. A fix will be available shortly.
Create Google Play Badges for your apps in multi-language

Visit here to create your Google Play badges, allow you to promote your app with official branding in your online ads, promotional materials, or anywhere else you want a link to your app.
Link: http://developer.android.com/distribute/googleplay/promote/badges.html
Turn on Traffic Layer of GoogleMap V2
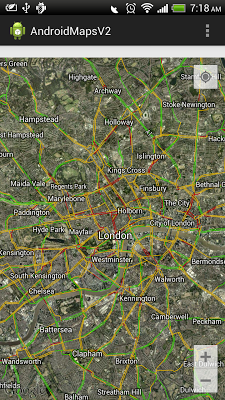
To turn on/off the traffic layer of GoogleMap, simple call the method setTrafficEnabled(boolean enabled).
Example:
The series:
A simple example using Google Maps Android API v2, step by step.
Example:
myMap.setTrafficEnabled(true);
The series:
A simple example using Google Maps Android API v2, step by step.
Enable/Disable various gestures for GoogleMap
To enable/disable various gestures for GoogleMap, call setRotateGesturesEnabled(boolean enabled), setScrollGesturesEnabled(boolean enabled), setTiltGesturesEnabled(boolean enabled) and setZoomGesturesEnabled(boolean enabled), or you can call setAllGesturesEnabled(boolean enabled) to set all gestures.
Example:
The series:
A simple example using Google Maps Android API v2, step by step.
Example:
  myMap.getUiSettings().setRotateGesturesEnabled(true);
  myMap.getUiSettings().setScrollGesturesEnabled(true);
  myMap.getUiSettings().setTiltGesturesEnabled(true);
  myMap.getUiSettings().setZoomGesturesEnabled(true);
  //or myMap.getUiSettings().setAllGesturesEnabled(true);
The series:
A simple example using Google Maps Android API v2, step by step.
Display ZoomControls, Compass and MyLocation buttons on GoogleMap.
To enable/disable ZoomControls, Compass and MyLocation buttons on GoogleMap, call the following methods of the UiSettings for GoogleMap.
The series:
A simple example using Google Maps Android API v2, step by step.
- setZoomControlsEnabled (boolean enabled):
Enables or disables the zoom controls. If enabled, the zoom controls are a pair of buttons (one for zooming in, one for zooming out) that appear on the screen. When pressed, they cause the camera to zoom in (or out) by one zoom level. If disabled, the zoom controls are not shown.
By default, the zoom controls are enabled. - setCompassEnabled (boolean enabled):
Enables or disables the compass. The compass is an icon on the map that indicates the direction of north on the map. If enabled, it is only shown when the camera is tilted or rotated away from its default orientation (tilt of 0 and a bearing of 0). When a user clicks the compass, the camera orients itself to its default orientation and fades away shortly after. If disabled, the compass will never be displayed.
By default, the compass is enabled (and hence shown when the camera is not in the default orientation). - setMyLocationButtonEnabled (boolean enabled):
Enables or disables the my-location button. The my-location button causes the camera to move such that the user's location is in the center of the map. If the button is enabled, it is only shown when the my-location layer is enabled.
By default, the my-location button is enabled (and hence shown when the my-location layer is enabled).
  myMap.getUiSettings().setZoomControlsEnabled(true);
  myMap.getUiSettings().setCompassEnabled(true);
  myMap.getUiSettings().setMyLocationButtonEnabled(true);
The series:
A simple example using Google Maps Android API v2, step by step.
Reminder: Windows 8 Previews will expire SOON!

Just a reminder, if you are using Windows 8 Preview, it will expire soon:
- Windows 8 Developer Preview and Consumer Preview will expire on January 15, 2013
- Windows 8 Release Preview will expire on January 16, 2013
Source: Microsoft Community
Nokia HERE, delivering maps for Apple iPhone, Android and Firefox OS
Nokia is taking its mapping solutions out to the wider world in the form of HERE, offering HERE for iOS for Apple iPhone and iPad users and offering Android developers the chance to make compelling mapping apps for their own platform.
Source: NOKNOK, powered by Nokia
Source: NOKNOK, powered by Nokia
Tips to add Support Library
In case you need to add Android Support Library, such as android-support-v4.jar; Google documents suggested to:
- In Eclipse Select Project > Properties, select Java Build Path, and navigate to Libraries.
- Select Add External Jars, include the following jar files, and click OK: <android-sdk-folder>/extras/android/compatibility/v4/android-support-v4.jar
But...I found that it is not always work, even always NOT work!
No error when you compile your code, but fail with error "Caused by: java.lang.NoClassDefFoundError: youractivity" at runtime.
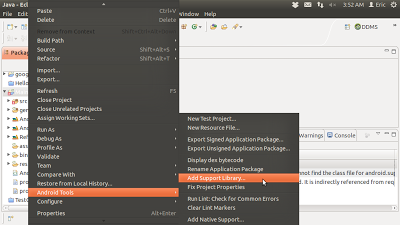
My alternatively, Right click your project, select Android Tools > Add Support Library...
----------
Here is another solution advised by Stefan de Bruijn in comments:
- create a folder called "libs", NOT "lib".
- copy the required jar in "libs" folder.
- Update Java Build Path by selecting "Add JARs..." (NOT "Add External JARs...") to add the jar in libs.
- like this: java.lang.NoClassDefFoundError: com.google.ads.AdView.
Ubuntu for phones
Ubuntu for phones - Industry proposition
Ubuntu founder Mark Shuttleworth explain Ubuntu's mobile strategy and what it offers industry partners.
Know more: http://www.ubuntu.com/devices/phone

!!!updated - Google Play services is not supported on the Android emulator
update@2013-07-26

With Android SDK updated, Google Play services SDK is now supported in Android Emulator with AVD that runs the Google APIs platform based on Android 4.2.2 or higher. Read the updated post.
Please don't test your app using Google Play services API (include Google Maps Android API v2) on Android emulator, because Google Play services is not supported on the Android emulator — to develop using the APIs, you need to provide a development device such as an Android phone or tablet; refer Google Play services SDK document.
Create Android Emulator AVD using Android Virtual Device Manager
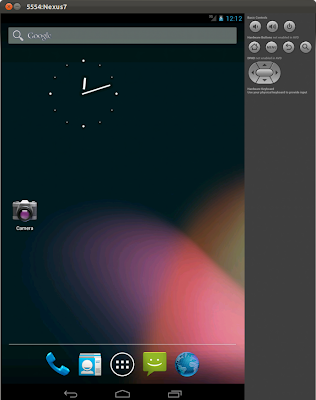
To create a new Android Virtual Device for Android Emulator using Android Virtual Device Manager:
- Click Window on Eclipse top menu, and select Android Virtual Device Manager.
- Your available AVDs will be listed in Android Virtual Device Manager.
- To create a new one, click New... button.
- Enter details; include your assigned AVD Name, target Device/CPU, optional setting of Camera, Internal Storage size, and SD Card size. And click OK to finish.
Remark: In my opinion, don't use Android Emulator to test your app if you have real Android device. It's very slooooow! And Google Play services (include include Google Maps Android API v2) is not supported on the Android emulator.
الاشتراك في:
الرسائل (Atom)


