Create your Treasure Map on Android
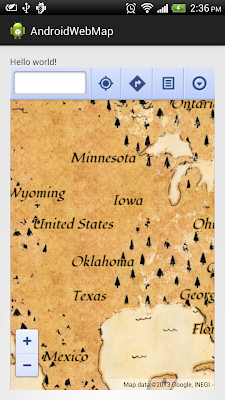
Refer to the post "Embed Google Map in WebView", you can create your own Treasure Map easily, by copy the link URL from http://maps.google.com/ with Treasure Mode selected, and replace it to mapPath in the MainActivity code.
Remark: I don't know will it back to normal tomorrow:)
FYI:
How to get Traffic come from International Space Station
If you have install Google Analytics, check your Real-Time report of Locations within today, you have 100% traffic from International Space Station!
Happy April Fools Day:)
Google Nose!? Is it a April Fools Joke?
Is it a April Fools Joke? http://www.google.com/nose/
Introducing Google Nose
We're excited to announce our newest addition to Search: Google Nose. What do wet dogs smell like? Google Nose! How about victory? Google Nose! Try searching on Google for "wet dog" and explore other smells that people sniffed for, or visit google.com/nose to learn more. Happy smelling!
ADK Example: Control Arduino Due LED from Android device
Example to show how to implement with ADK, to control LED on Arduino Due from Android device.
Refer to my another blog for Arduino:
Google Maps Engine Lite (Beta) launched
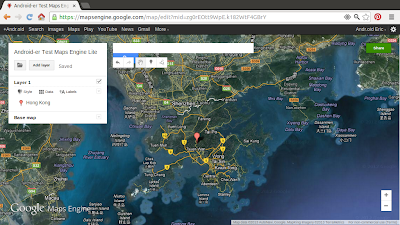
Google is launching Google Maps Engine Lite (Beta) helping you create advanced custom maps to share with collaborators and also publish to the web. You can visualize and map more data, import locations from a spreadsheet, use layers to visualize different types of content, or simply draw and add places, lines, and shapes.
Visit: Log-in your google account and browse Google Maps Engine Lite
- Learn more about Maps Engine Lite (Beta)
Visit: Log-in your google account and browse Google Maps Engine Lite
 |
| Google Maps Engine Lite |
- Learn more about Maps Engine Lite (Beta)
Create a PendingIntent for Notification to do nothing
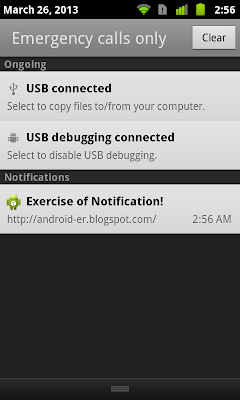
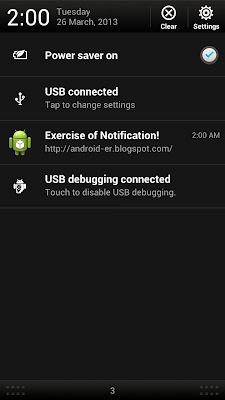
Refer to the last post "error of using NotificationCompat.Builder, IllegalArgumentException: contentIntent required", if you want no action perform when user click on the Notification, you can insert a PendingIntent with a dummy Intent.
Example:
Example:
    PendingIntent pendingIntent = PendingIntent.getActivity(
      MainActivity.this,
      0,
      new Intent(),  //Dummy Intent do nothing
      Intent.FLAG_ACTIVITY_NEW_TASK);

    myNotification = new NotificationCompat.Builder(context)
          .setContentTitle("Exercise of Notification!")
          .setContentText("http://android-er.blogspot.com/")
          .setTicker("Notification!")
          .setWhen(System.currentTimeMillis())
          .setContentIntent(pendingIntent)
          .setDefaults(Notification.DEFAULT_SOUND)
          .setAutoCancel(true)
          .setSmallIcon(R.drawable.ic_launcher)
          .build();
error of using NotificationCompat.Builder, IllegalArgumentException: contentIntent required
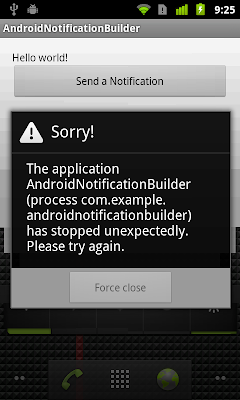
Refer to the exercise "Example of using NotificationCompat.Builder"; if the statement of new NotificationCompat.Builder...build() modified to remove .setContentIntent(pendingIntent), error of java.lang.IllegalArgumentException: contentIntent required MAY be thrown.
It will have no error in compile time, and no error when run on HTC One X (Android 4.1.1) and HTC Fly (Android 3.2.1). But error when run on Nexus One (Android 2.3.6), with error:
03-27 21:33:40.631: D/AndroidRuntime(24248): Shutting down VM
03-27 21:33:40.631: W/dalvikvm(24248): threadid=1: thread exiting with uncaught exception (group=0x40015560)
03-27 21:33:40.651: E/AndroidRuntime(24248): FATAL EXCEPTION: main
03-27 21:33:40.651: E/AndroidRuntime(24248): java.lang.IllegalArgumentException: contentIntent required: pkg=com.example.androidnotificationbuilder id=1 notification=Notification(vibrate=null,sound=default,defaults=0x1,flags=0x10)
03-27 21:33:40.651: E/AndroidRuntime(24248): at android.os.Parcel.readException(Parcel.java:1326)
03-27 21:33:40.651: E/AndroidRuntime(24248): at android.os.Parcel.readException(Parcel.java:1276)
03-27 21:33:40.651: E/AndroidRuntime(24248): at android.app.INotificationManager$Stub$Proxy.enqueueNotificationWithTag(INotificationManager.java:274)
03-27 21:33:40.651: E/AndroidRuntime(24248): at android.app.NotificationManager.notify(NotificationManager.java:111)
03-27 21:33:40.651: E/AndroidRuntime(24248): at android.app.NotificationManager.notify(NotificationManager.java:91)
03-27 21:33:40.651: E/AndroidRuntime(24248): at com.example.androidnotificationbuilder.MainActivity$1.onClick(MainActivity.java:52)
03-27 21:33:40.651: E/AndroidRuntime(24248): at android.view.View.performClick(View.java:2485)
03-27 21:33:40.651: E/AndroidRuntime(24248): at android.view.View$PerformClick.run(View.java:9080)
03-27 21:33:40.651: E/AndroidRuntime(24248): at android.os.Handler.handleCallback(Handler.java:587)
03-27 21:33:40.651: E/AndroidRuntime(24248): at android.os.Handler.dispatchMessage(Handler.java:92)
03-27 21:33:40.651: E/AndroidRuntime(24248): at android.os.Looper.loop(Looper.java:130)
03-27 21:33:40.651: E/AndroidRuntime(24248): at android.app.ActivityThread.main(ActivityThread.java:3683)
03-27 21:33:40.651: E/AndroidRuntime(24248): at java.lang.reflect.Method.invokeNative(Native Method)
03-27 21:33:40.651: E/AndroidRuntime(24248): at java.lang.reflect.Method.invoke(Method.java:507)
03-27 21:33:40.651: E/AndroidRuntime(24248): at com.android.internal.os.ZygoteInit$MethodAndArgsCaller.run(ZygoteInit.java:839)
03-27 21:33:40.651: E/AndroidRuntime(24248): at com.android.internal.os.ZygoteInit.main(ZygoteInit.java:597)
03-27 21:33:40.651: E/AndroidRuntime(24248): at dalvik.system.NativeStart.main(Native Method)
If you want no action perform when user click on the Notification, you can create a PendingIntent with empty Intent for Notification to do nothing.
Example of using NotificationCompat.Builder
Last exercise demonstrate "Notification.Builder". If your app supports versions of Android as old as API level 4, you can instead use NotificationCompat.Builder, available in the Android Support library.
Simple replace Notification.Builder with NotificationCompat.Builder, and import android.support.v4.app.NotificationCompat.
Related:
- error of using NotificationCompat.Builder, IllegalArgumentException: contentIntent required
Simple replace Notification.Builder with NotificationCompat.Builder, and import android.support.v4.app.NotificationCompat.
    myNotification = new NotificationCompat.Builder(context)
          .setContentTitle("Exercise of Notification!")
          .setContentText("http://android-er.blogspot.com/")
          .setTicker("Notification!")
          .setWhen(System.currentTimeMillis())
          .setContentIntent(pendingIntent)
          .setDefaults(Notification.DEFAULT_SOUND)
          .setAutoCancel(true)
          .setSmallIcon(R.drawable.ic_launcher)
          .build();
Related:
- error of using NotificationCompat.Builder, IllegalArgumentException: contentIntent required
Example of using Notification.Builder
android.app.Notification.Builder is a builder class for Notification objects. Provides a convenient way to set the various fields of a Notification and generate content views using the platform's notification layout template. If your app supports versions of Android as old as API level 4, you can instead use NotificationCompat.Builder, available in the Android Support library.
Note: minSdkVersion have to be set ="16".
package com.example.androidnotificationbuilder;

import android.app.Activity;
import android.app.Notification;
import android.app.NotificationManager;
import android.app.PendingIntent;
import android.content.Context;
import android.content.Intent;
import android.net.Uri;
import android.os.Bundle;
import android.view.View;
import android.view.View.OnClickListener;
import android.widget.Button;

public class MainActivity extends Activity {

 private static final int MY_NOTIFICATION_ID=1;
 NotificationManager notificationManager;
 Notification myNotification;
 private final String myBlog = "http://android-er.blogspot.com/";

 @Override
 protected void onCreate(Bundle savedInstanceState) {
  super.onCreate(savedInstanceState);
  setContentView(R.layout.activity_main);
  Button buttonSend = (Button)findViewById(R.id.send);
  buttonSend.setOnClickListener(new OnClickListener(){

   @Override
   public void onClick(View arg0) {
    Context context = getApplicationContext();
    Intent myIntent = new Intent(Intent.ACTION_VIEW, Uri.parse(myBlog));
    PendingIntent pendingIntent = PendingIntent.getActivity(
      MainActivity.this,
      0,
      myIntent,
      Intent.FLAG_ACTIVITY_NEW_TASK);

    myNotification = new Notification.Builder(context)
          .setContentTitle("Exercise of Notification!")
          .setContentText("http://android-er.blogspot.com/")
          .setTicker("Notification!")
          .setWhen(System.currentTimeMillis())
          .setContentIntent(pendingIntent)
          .setDefaults(Notification.DEFAULT_SOUND)
          .setAutoCancel(true)
          .setSmallIcon(R.drawable.ic_launcher)
          .build();

    notificationManager = (NotificationManager)getSystemService(Context.NOTIFICATION_SERVICE);
    notificationManager.notify(MY_NOTIFICATION_ID, myNotification);

   }});

 }

}
<LinearLayout xmlns:android="http://schemas.android.com/apk/res/android"
    xmlns:tools="http://schemas.android.com/tools"
    android:layout_width="match_parent"
    android:layout_height="match_parent"
    android:paddingBottom="@dimen/activity_vertical_margin"
    android:paddingLeft="@dimen/activity_horizontal_margin"
    android:paddingRight="@dimen/activity_horizontal_margin"
    android:paddingTop="@dimen/activity_vertical_margin"
    android:orientation="vertical"
    tools:context=".MainActivity" >

    <TextView
        android:layout_width="wrap_content"
        android:layout_height="wrap_content"
        android:text="@string/hello_world" />
    <Button
        android:id="@+id/send"
        android:layout_width="fill_parent"
        android:layout_height="wrap_content"
        android:text="Send a Notification" />

</LinearLayout>
Note: minSdkVersion have to be set ="16".
Kick-start Google Maps Android API v2 Development
Shortcuts: Kick-start Google Maps Android API v2 Development
In this Shortcuts episode, Chris Broadfoot shows how to get started with Google Maps Android API v2 in five minutes or less with his Android "hellomap" bootstrap project for Eclipse, IntelliJ, or Ant.
http://github.com/googlemaps/hellomap-android
My series:
A simple example using Google Maps Android API v2, step by step.
Preview Qt 5 for Android
Qt 5 Cinematic Experience demo on Android
Qt 5 Cinematic Experience demo (by quitcoding.com) running on three different Android devices. From left to right: Nexus 4, Asus Transformer TF300, Nexus 7.
Andy Rubin had moved from the Android division
On 13 March 2013, it was announced by Larry Page in a blog post that Andy Rubin had moved from the Android division to take on new projects at Google. He was replaced by Sundar Pichai, who also continues his role as the head of Google's Chrome division.
Andrew E. Rubin is the co-founder and former CEO of both Danger Inc., and Android Inc. He was formerly Senior Vice President of Mobile and Digital Content at Google until March 2013, where he oversaw development of Android, an open-source operating system for smartphones. ~ Source: Wikipedia
Read blog post by Larry Page
What is Iterable?
In the exercise "Draw hollow Polygon on Map, using addHole() method", object of ArrayList<LatLng> is passed to addHole() as Iterable<latlng>. And...what is Iterable?
Described in Android document: Iterable<T>: Instances of classes that implement this interface can be used with the enhanced for loop. In Java 6 document (Android now support JDK6), this interface allows an object to be the target of the "foreach" statement.
Here is example to use Iterable in for loop and while loop.
package com.example.androiditerable;

import java.util.ArrayList;
import java.util.Iterator;

import android.os.Bundle;
import android.app.Activity;
import android.widget.TextView;

public class MainActivity extends Activity {

    @Override
    protected void onCreate(Bundle savedInstanceState) {
        super.onCreate(savedInstanceState);
        setContentView(R.layout.activity_main);

        TextView text_for = (TextView)findViewById(R.id.result1);
        TextView text_while = (TextView)findViewById(R.id.result2);

        ArrayList<String> arrayList = new ArrayList<String>();
        arrayList.add("Sunday");
        arrayList.add("Monday");
        arrayList.add("Tuesday");
        arrayList.add("Wednesday");
        arrayList.add("Thursday");
        arrayList.add("Friday");
        arrayList.add("Saturday");

        String result_for = "";
        for(String item : arrayList){
         result_for += item + "\n";
        }
        text_for.setText(result_for);

        Iterator<String>  iterator = arrayList.iterator();
        String result_while = "";
        while (iterator.hasNext()){
         result_while += iterator.next() + "\n";
        }
        text_while.setText(result_while);

    }

}
<LinearLayout xmlns:android="http://schemas.android.com/apk/res/android"
    xmlns:tools="http://schemas.android.com/tools"
    android:layout_width="match_parent"
    android:layout_height="match_parent"
    android:orientation="vertical"
    tools:context=".MainActivity" >

    <TextView
        android:layout_width="wrap_content"
        android:layout_height="wrap_content"
        android:text="@string/hello_world" />
    <TextView
        android:id="@+id/result1"
        android:layout_width="wrap_content"
        android:layout_height="wrap_content" />
    <TextView
        android:id="@+id/result2"
        android:layout_width="wrap_content"
        android:layout_height="wrap_content" />

</LinearLayout>
FREE eBook: Your Unofficial Raspberry Pi Manual
Raspberry Pi: The Unofficial Tutorial, By Christian Cawley, http://www.makeuseof.com
Get to know the world’s favorite $25 computer: the Raspberry Pi. You’ll find tips, tricks and more in this unofficial Raspberry Pi tutorial from MakeUseOf. Whether you’re a current Pi owner who wants to learn more or a potential owner of this credit-card size device, this isn’t a guide you want to miss.
Table Of Contents
Download Link: http://www.makeuseof.com/pages/great-things-small-package-your-unofficial-raspberry-pi-manual
Get to know the world’s favorite $25 computer: the Raspberry Pi. You’ll find tips, tricks and more in this unofficial Raspberry Pi tutorial from MakeUseOf. Whether you’re a current Pi owner who wants to learn more or a potential owner of this credit-card size device, this isn’t a guide you want to miss.
Table Of Contents
- §1 – The Raspberry Pi
- §2 – What’s Inside the Raspberry Pi?
- §3 – What You Will Need for Your Raspberry Pi
- §4 – Setting Up the Raspberry Pi
- §5 – Getting to Grips with the GUI
- §6 – Programming on the Pi
- §7 – Configuring the Raspberry Pi as a Media Centre
- §8 – Fascinating Uses for the Raspberry Pi
- §9 – Raspberry Pi: A Versatile Mini Computer
- §10 – The Cream on Your Raspberry Pi
Download Link: http://www.makeuseof.com/pages/great-things-small-package-your-unofficial-raspberry-pi-manual
Install repo on Ubuntu
Repo is a tool that makes it easier to work with Git in the context of Android.
- Before install repo, we have to install curl and git.
To install curl, enter the command in Terminal.
$sudo apt-get install curl
To install git, enter the command.
$sudo apt-get install git
- Then create bin/ directory in home directory, and include it in your path.
$ mkdir ~/bin
$ PATH=~/bin:$PATH
- Download the Repo script and ensure it is executable
$ curl https://dl-ssl.google.com/dl/googlesource/git-repo/repo > ~/bin/repo
$ chmod a+x ~/bin/repo
To know more about how to download the source code od Android, read here.
الاشتراك في:
الرسائل (Atom)
